
- Home
- Making a start
- Design & Planning
- Windows & Rooflights
- Insulation & Flooring
- Furniture
- Beds & Seats
- Kitchen
- Washroom
- Electrics
- Gas
- Water
- Heating
- Lighting
- Security
- Accessories
- Sources & Suppliers
- Cost Guide
- Specification
- Tools-Materials-Methods
- About Us
- Gallery

Mileage travelled:


Site News
Lounge Beds and Seats. Cab Seats
Sofa/bed Design

In the design of the sofa/bed and the small seat/bed we wanted the choice of using them as singles or as a double bed. With the X250 Ducato having an internal width 1870mm (6ft 1 5/8in.) it is also possible to fit a 6ft wide double bed across the van in a 'front lounge' layout, even allowing for wall insulation and ply lining. As the sofa is also 6ft long, we therefore have a double bed 6 feet square - we don't even have that at home! This gives an option of sleeping longways or across the van.
The sofa base extends in two sections so they are light and easy to slide out and back - this also gives several options for the bed shape. They can be hinged upwards individually to gain access to the bed box interior.
Mad Mumsie's replacement hips don't allow her to grovel on her knees, so there seemed little point in making small hinged access doors in the front of the bed base (a feature often seen on Pro conversions). Such doors do save having to lift seat cushions to get at the storage space, although how much one could actually reach through these doors with all the clutter that goes into these bases is debatable.
Dimensions

We designed the sofa to be a similar height as our furniture at home because it is a comfortable height for us. We tested a mockup sofa with a table to see if the height was suitable for eating - it is. The base is 14in. high, the foam 7in. thick giving an overall height of 21 inches. It seems to work well for us; we are only 5ft 6in. tall, taller folks may find it a little low. The sofa foam measures 72in. long by 29in. wide; the small seat/bed (when extended) is 72in. long by 28in. wide. If used as singles the gap between the two beds is 15 inches.
Note, making a bed base this low (14 inches) does mean it may not be possible to fit some types of water/space heater in the base as these items tend to be quite tall - see Heating Section for more details.
'Official' bed length. In the UK, for a completed van conversion to be classed by the DVLA as a 'motor caravan' on the V5C registration document, the bed has to measure 6 feet long (a width is not specified). A 'bed' can include the base of a swivelled cab seat to make up the length.
Upholstery

For the seat cushions we chose not to have knee rolls or piped edging - this makes for a smoother mattress when the small seat is made up into a bed.
All the cushion covers are zipped so they can be removed for cleaning. The cushions are covered all over in the same material, so can be placed any way up - this, hopefully, to minimise wear.
Making up the beds

As two single beds with small seat/bed extended.
The two back cushions from the sofa can be stored in the cab.
The back and arm cushions from the small seat/bed, plus the arm cushion from the sofa, make up the other parts of the small seat/ bed mattress. Placed in this way the joins are not uncomfortable for sleeping.
If desired, the number of cushions can be reduced - see below.

Old pic shows the 'interim' table can fit between the beds, but we don't use it at night - we do, however...

... extend one base and add one sofa back cushion - it gives a bit more space to sprawl and gives legroom when getting up.

Making up the double bed. Make up both singles first, then cab end section pulls out...

...then second section.

The 6 foot square double bed!
We believe the above sequence is the easiest way to make up the double bed without the bedmaker finding themself either: in the cluttered cab area, or outside with the sliding door open wearing pyjamas with the rain pouring down!

Update. Reducing the number of cushions. The small seat/bed uses four cushions to make up its mattress - this really isn't a problem - the bed is fine for sleeping on and the time spent making up the bed is minimal.
However, the number of cushions could be reduced to three by making the seat back cushion longer. This would in effect make the back cushion taller, so the end kitchen panel behind the seat back would also have to be made higher - this would effectively make a divider between the seat and kitchen worktop - we have seen this on many pro-conversions.
We did not want a 'divider' between the seat and kitchen worktop as we would lose the sweep and openess of the furniture on that side - a divider would tend to enclose the lounge area.
If the three cushion option was chosen the side cushion on the small seat/bed would be redundant. This would lose the chaise longue 'look' of the small seat.
Sofa/bed Construction
Here a series of pics to show the details. We had many questions about the sofa/bed construction so we hope the following are helpful.
Click on following pics to enlarge

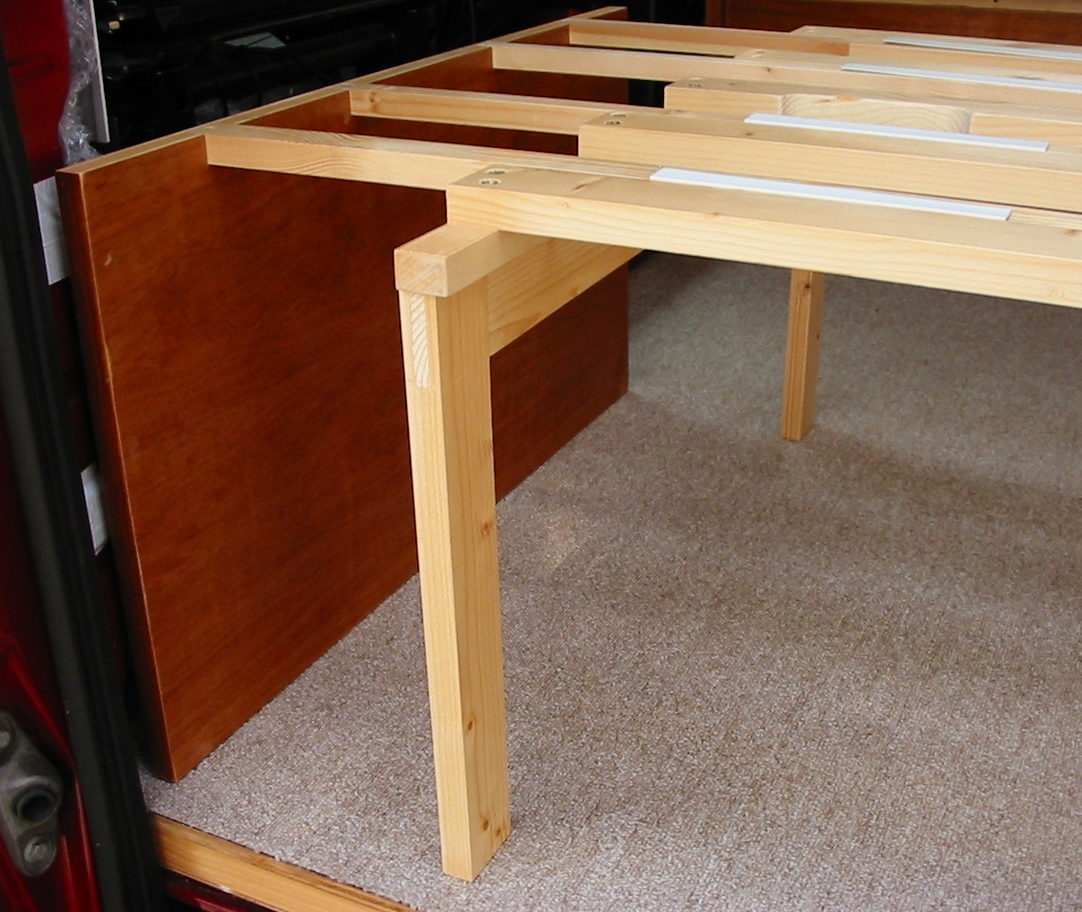
If the bed slat construction looks a little heavy it's simply that we once had an accident with a solid beech slatted bed base that collapsed when the slats 'sprung' the opposite way! True, there's very little spring as such in our bases, but the mattress/cushion is seven inches of high quality foam thick. Our old caravan only had four inch cushions on a plain plywood base so we are used to hardship! Have no doubt, although firm, these beds are extremely comfortable, we sleep very well.
The bed base end panels and the front legs are lightweight, hollow double-skinned 3.5mm ply/strip construction; this produces a panel about 18mm thick; see Furniture section for details.
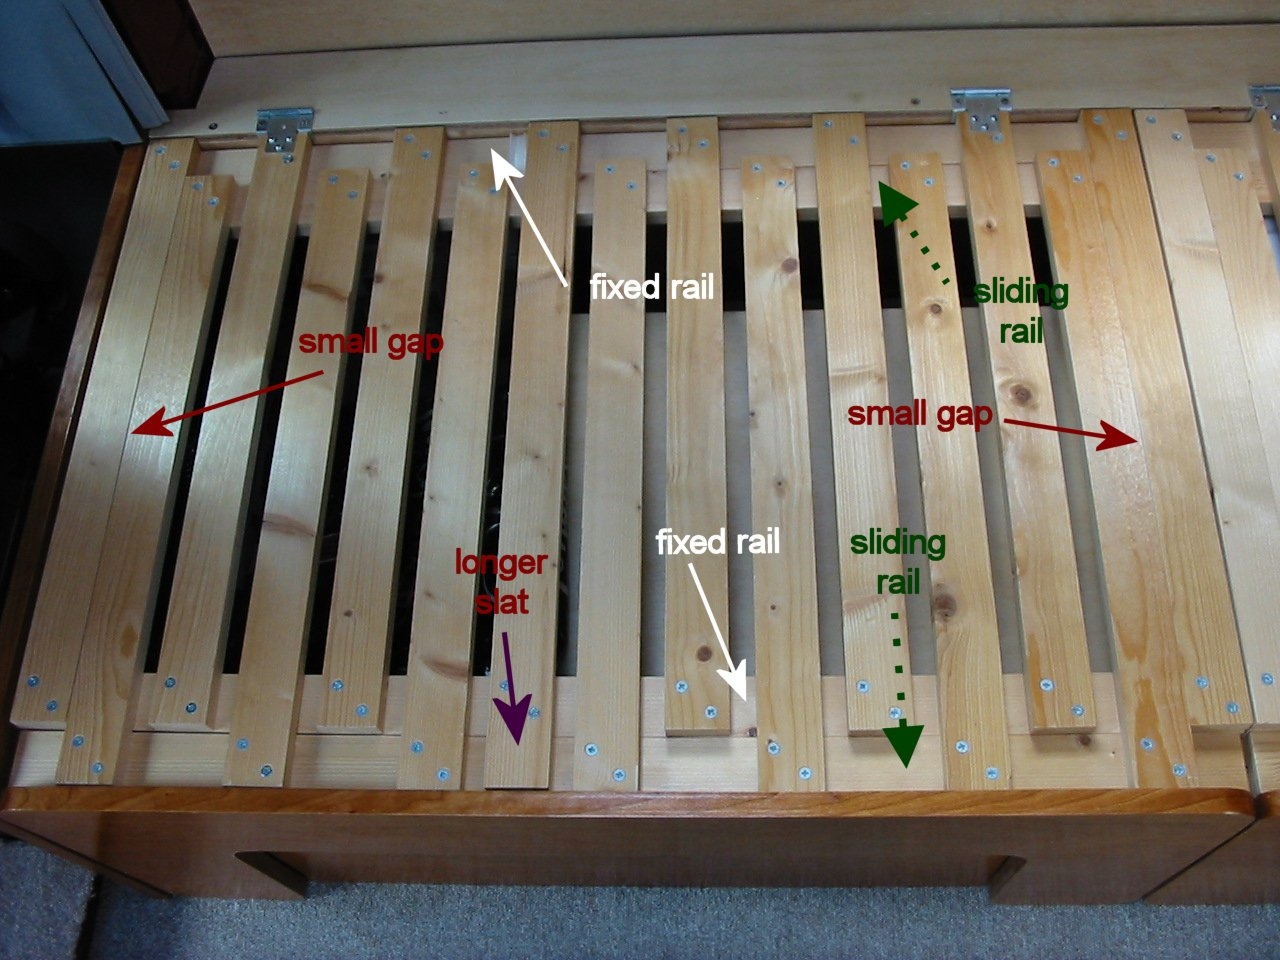
Left-hand section in close-up.
N.B. the two sliding cross rails are the same length as the two fixed cross rails.
The small gaps (3-4mm) arrowed stop the sliding section from wobbling side to side too much as the sliding section is pulled out.
Note one slat on fixed section is longer - this keeps both fixed and sliding sections together when they are lifted for access to the base interior.

Right-hand section is identical to left-hand.
All the cross rails and slats are made from stock 44x18mm PSE timber.

The longer slat has packing under at front so sliding section cross rail will pass under easily.

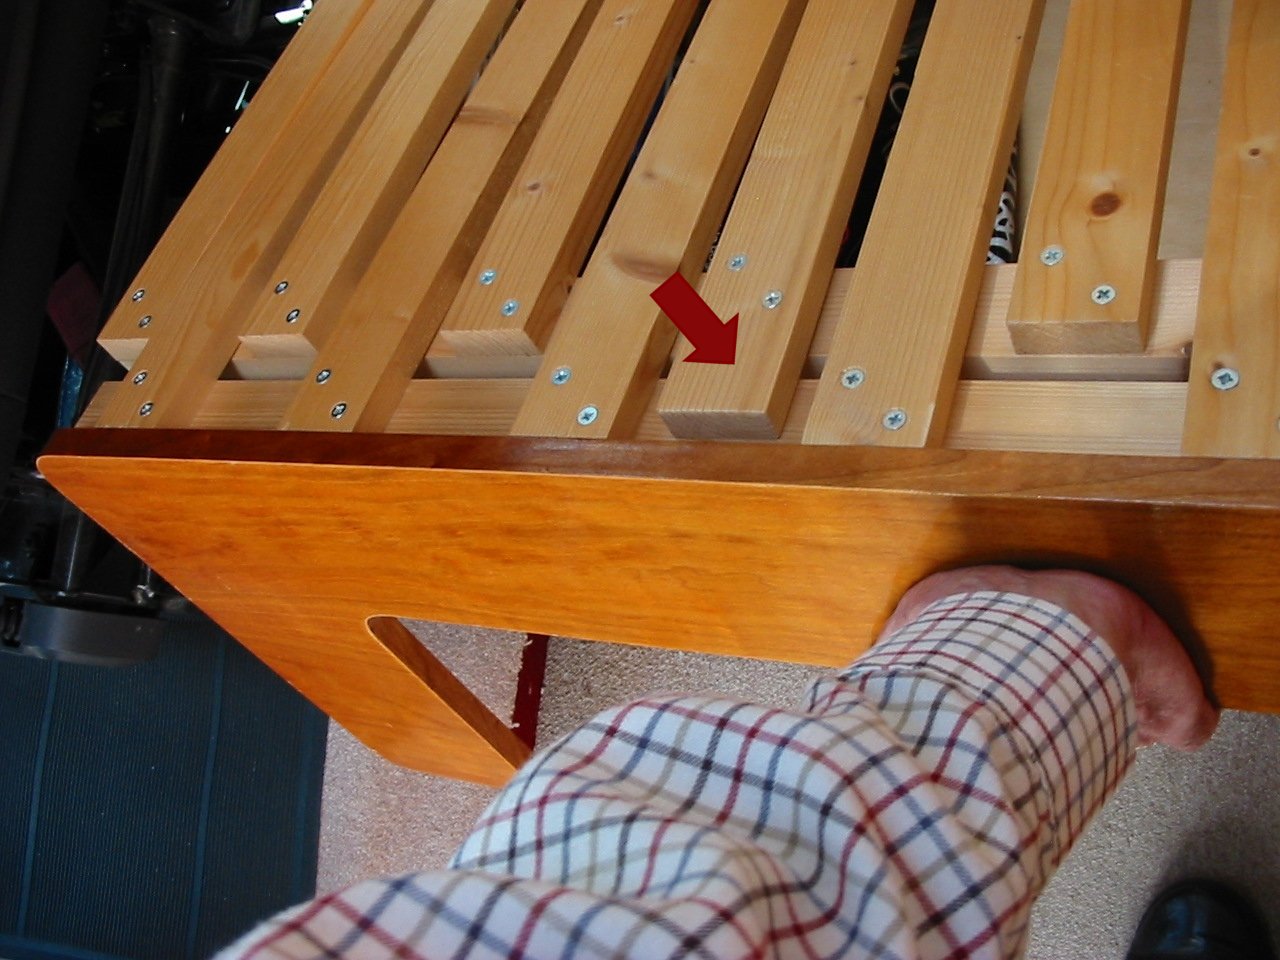
Left-hand pull-out section extended

Modification to pull-out section (not shown in other pics). If the right-hand end of the front rail is cut off square, it can catch on one's leg if the cushion is not fully in place - a good chamfer avoids this.
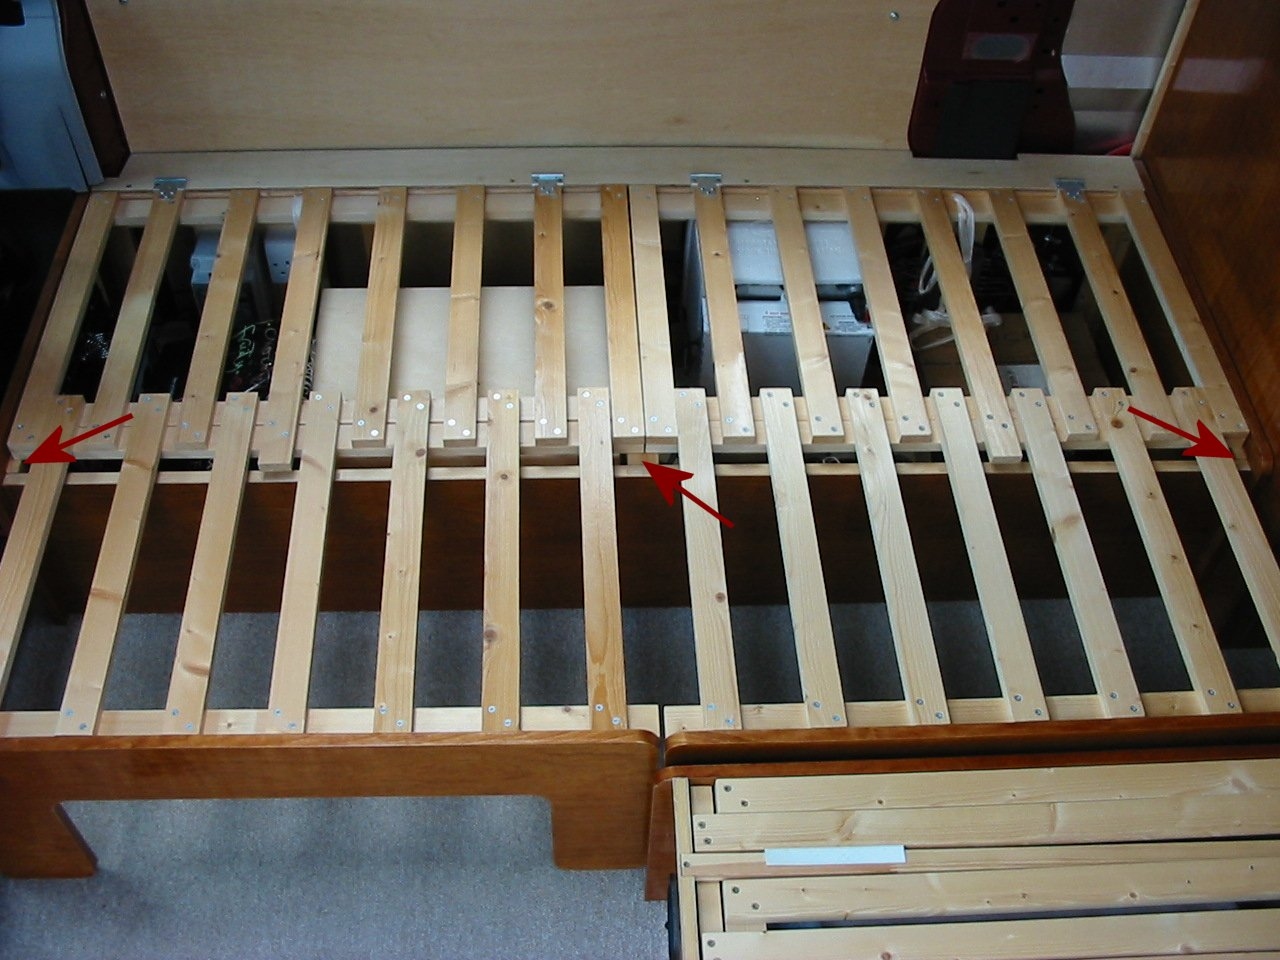
Right-hand pull-out section extended.
Arrows show the cross rails run on timber support strips fixed to the base sides and the centre frame.
Lifting the pull-out and fixed parts showing the longer slat on fixed section doing its job.
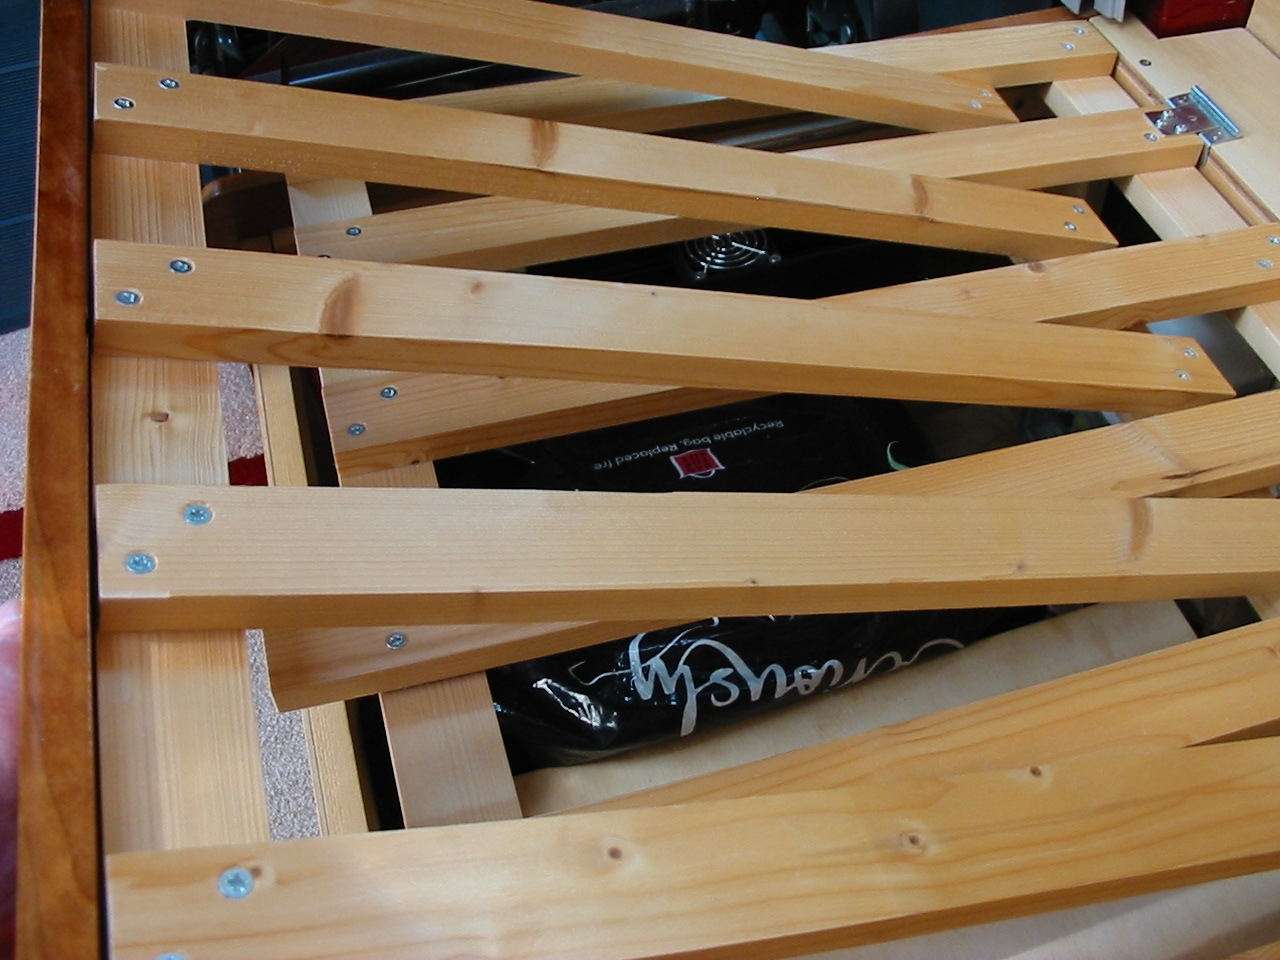
What happens if you pull the sliding section out too far and then lift!

The leg is fixed with four long screws that go through the front rail (inserted from the back) and into the back of the leg.
Although four screws have been adequate, on reflection, six screws would be better.

Viewed from underneath and behind the leg. Pic shows one of the leg fixing screws going through the front cross rail and into the back of the plywood leg.

Hinge detail. This 'cranked' type are usually used for cupboard doors. We used this type as we just happened to have them and could get a good fixing with 3 screws into the slat.

Both slatted sections lifted

Early pic of sofa bed base before all the electrics etc were fitted. The back of the bed box is a simple open 44 x 18mm timber frame with half lap joints. Note an additional strip is screwed along the top for mounting the hinges and the ply infill and levels the base with the slatted sections.

The front of the base is a similar timber frame in 44x18mm timber, but with 4mm Cherry veneer ply glued to the front face. The ends are hollow panels, double-skinned in veneered ply. The panels have 18x18 stripwood screwed to the outside to fix the panels to the floor and join with the back and front frames. A 33x18 strip screwed near the top along the sides acts a support for the cross rails.

The centre support is just a simple open frame with addition strip of 44x18 added along the top to support the ends of the four cross rails arrowed. Method of making all these frames in Furniture Section.
Small seat/bed

The small seat bed is of similar construction to the sofa.
The seat base back frame is bolted to the fridge side panel and has a single veneered ply covering. The base sides are the same as the sofa.
The sliding slats section works in the same fashion, but has extra parts to extend the bed one stage further. This is in the prototype development stage at present!

The front panel is attached to the sliding pull-out frame with smaller sliding slats and moves outwards after the main sliding section has reached its limit. The main sliding section has simple timber legs that are hidden when the front panel is pushed fully back. Hopefully, the pics explain the idea, but still needs some work.


Cab Seats
Originally the van came with a double passenger seat. This was our error, we should have specified a single swivelling seat. In early 2008 there were very few Sevel-built X250 type vans about in the UK. This meant if we wanted to keep to original seats/seat base we would have to buy from a Fiat/Citroen/Peugeot dealer as no breakers yards at that time had them. We made an enquiry with the local Fiat dealership who quoted £2,300 for a single swivelling cab seat complete (pause for one moment while we fall about laughing...); we tried various other van/lorry seat suppliers with no luck.
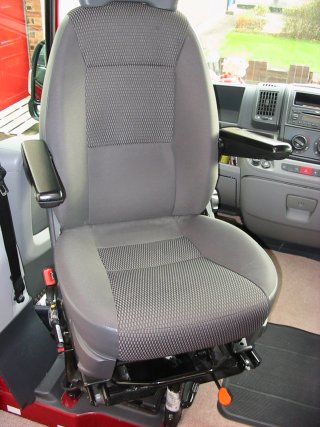
Finally, we managed to get a new one (see Sources for the then supplier), although it had Citroen grey-coloured covers we were happy with it. This seat has folding arm rests, like the driver's seat.
We understand (from the SBMCC forum, bless 'em) that nowadays genuine original Sevel seats are easier to obtain from van/lorry seat specialists at sensible prices.

Close-up of the passenger seat base and swivel plate in swivelled position. The separate steel base frame is genuine Fiat item - it is the same as the one used for the drivers seat (note the steel frame on the seat itself is NOT the same as the driver's seat - see below). The swivel plate is a crash tested approved FASP item. To swivel the seat, the orange button is pushed down to release the spung catch and then sideways pressure is applied with one's legs to turn the seat.
The base frame is held to the floor by four large high-tensile bolts - these are the same bolts and fixings that were used for the double seat.

If changing a double seat for a single passenger seat then it is a simple job to unbolt the double seat, and replace it with a single seat frame. The two seatbelt buckles (pretensioners) on the double seat have to be unbolted and removed - only one will be needed - but this creates a problem. The seat belt pre-tensioners are wired - if the wiring is disconnected on the spare pretensioner, then a warning light will appear on the dashboard - a Mot failure if not dealt with.
Warning: Do take great care when handling pretensioners or its associated cabling - pretensioners contain a powerful explosive charge.
There are two solutions we know of: one to keep the spare pretensioner and tuck it up under the passenger seat out of the way, or remove the assembly and substitute it with a suitable resistor attached to the wiring to 'fool' the electronics into believing the buckle is still in place.

We chose to keep the spare buckle and its wiring - that is it wrapped in polythene in the pic and firmly held to the frame with cable ties. A Fiat dealer should be able to advise on the resistor value if choosing that option. A third option may be a software 'fix' by a dealership - we don't know - it won't be cheap...

The plastic box that holds the jack and tools can be refitted under the single seat - however, the box does stick out a little at the back.

Side view of the passenger seat in partly swivelled position (seat still facing front). The FASP swivel is just two steel plates joined in the centre with a bearing. The lower plate is bolted at each corner to the Fiat base frame using four countersunk 8mm high-tensile bolts and nuts with shakeproof washers. The upper plate is bolted to the seat frame with hex high-tensile bolts and nuts.

Back of the seat in fully swivelled position.

Close-up of the swivel showing how the swivel assembly raises the seat by 38mm (1.5in.) approx.
This raising of the seat can cause problems if one is short in the leg - the legs finish up dangling. Mad Mumsie has a plastic box to rest her feet on. We don't have a swivel on the driver's seat as the sofa is too close to the seat.

The driver's seat and framework showing the seatbelt buckle and mounting. Note the top steel tube running along the rear and how it projects on the left side.

The rear of the passenger seat showing the buckle mounting on the right. Note the top steel tube projects on the right side (red arrow) but not on the left (white arrow).
As this tube does not project on the right side on the driver's seat, it means a driver's seat cannot be used as a passenger seat without modification as there is no fixing for the buckle mounting. Any 'local' modification to the seat frame is bound to infringe on the crash testing approval, giving rise to insurance implications.