
- Home
- Making a start
- Design & Planning
- Windows & Rooflights
- Insulation & Flooring
- Furniture
- Beds & Seats
- Kitchen
- Washroom
- Electrics
- Gas
- Water
- Heating
- Lighting
- Security
- Accessories
- Sources & Suppliers
- Cost Guide
- Specification
- Tools-Materials-Methods
- About Us
- Gallery

Mileage travelled:


Site News
12 Volt Electrics.
Overview
Before deciding on the 12 volt installation, we gave some thought to which 12 volt equipment we would ultimately have and how, and where, we were going to use the van.
If we intended only stopping at campsites with mains electric hook-up and all we had was a few lights, a water pump, a water heater, and a gas 3-way fridge, then one good 80amp/hour leisure battery connected to a simple mains charger would probably do. This was the set-up we had in our caravan with a 'Zig' panel-mount leisure battery charger to control the battery and mains supply. While we were on the move, a simple split-charge relay allowed the alternator to supply a 12 volt feed to the gas 3-way fridge, plus a second relay to send a feed to charge the leisure battery.
Having decided on a 12 volt compressor fridge, which had to be kept running off the leisure battery at all times, plus other appliances, meant we'd need a bigger capacity battery and a more controlled method of charging and monitoring. A Sterling Battery to Battery charger is an alternative to split-charge relays, and has other useful features described below.
Wanting to be self-sufficient meant if we spent a couple of nights with no electrical hook-up, two fully-charged 110amp/hour batteries would probably do, but if we wanted to stay longer, then the charging system would have to be expanded to meet our needs. Apart from the van's engine/alternator as a source of power, we'd also have to consider using an external source, such as a petrol generator (not popular!) to power a mains battery charger, or install sufficient solar panels to match demand on the battery. Like many others, we have chosen the solar panels route.
• Update. It is very easy to get carried away with the idea that fitting a huge bank of leisure batteries and a vast array of solar panels will mean one can stay for a week in an idyllic wild-camping spot without having to move!
Bear in mind that one will need a supply of fresh drinking water; will need to store grey waste water, and the contents of the chemical toilet (until a proper disposal point is found) - so it will mean some rather large storage tanks. Also, if you like fresh food and milk (and keeping your wine cool), a small 80 litre capacity fridge is going to struggle to cope.
We've found that 3 days/nights without moving and solely relying on the van's equipment is just about our limit. •
Basic Installation


General view of the original 12volt installation in sofa/bed base using Elecsol batteries (now replaced after 5 years by Banner Energy Bull).
The 50 Watt Sterling Battery to Battery (B2B) charger is fitted on the left panel close to the van starter battery to avoid voltage drop. The output from the leisure batteries is taken to a fused distribution panel mounted in the right-hand corner. Cables can route from the fuse panel into the under-floor duct, or, encased in plastic conduits, up a vertical rib in the van's bodywork to the control panel. The in-line battery fuse and master switch are mounted on the outside of the battery box.

The two Banner Energy Bull 115Ah batteries are housed in a 12mm ply box with lid secured by four sprung catches. These batteries are taller and have a different case design to that used on the Elecsol batteries; they cannot be clamped down at their base, so a strap will be fitted over each battery to secure it.
The batteries take up a good quarter of the bed box space, we did consider fitting them in a box sunk in the floor (same as the van starter battery), but this would have meant constructing a robust steel box and cutting a very big hole - not keen on that. It does mean they are kept in the warm where they are, and in the colder months maintain a higher state of charge.

As these are lead-acid batteries and not 'sealed for life' type, they have a small vent hole at one end of the casing (arrowed); a vent tube (not supplied with battery) has been fitted tightly into the hole. The tubes are then routed through a hole (grey arrow) in the battery box base and van floor to the outside.
It is important that the batteries can vent, either to the outside, or via a vent in the bed base to prevent a build-up of any hydrogen gas that can be given off should the batteries be overcharged due to a fault.
The batteries power the compressor fridge, lights, water pump, gas water heater control, gas space heater fan and controls, plus the level gauges on the water tanks and gas hob and oven ignition/light. Having added the solar power regulator and remote panel, the leisure batteries provide power to those too!
Note, these particular lead-acid batteries do require regular monthly checks on the electrolyte level and topping up with distilled water. This especially true when the batteries are being worked hard in hot weather when the fridge is working flat out and the solar panels are producing a high output. It can take nearly a litre in total of distilled topping-up water.
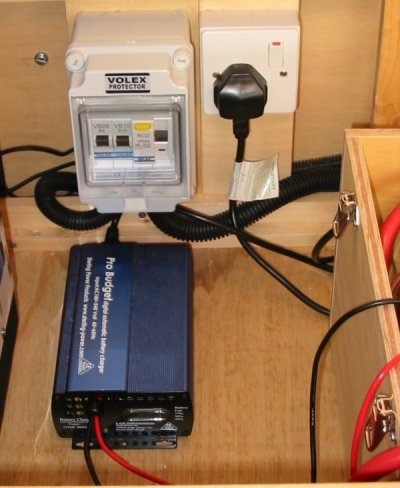
A 240v. mains charger (shown left) is also required. This will charge the leisure batteries from the campsite mains supply in the event the solar panels are not producing sufficient charge.
The mains charger can be permanently wired to the leisure battery, however we have left ours 'loose' so it can also be used to charge a battery away from the van.
Schematic Wiring Diagram
The diagrams show our basic 12volt system. See Solar Section for solar panel wiring.

Note: the cable shown dotted going from van battery +ve to alternator is the van's existing positive feed - The Sterling B2B installation does not require its own connection to be made to the alternator.
The 25amp in-line fuse on each battery positive terminal is a suggested safety feature should one battery suffer a shorted cell.
Cable sizes are shown in table below.
Leisure Battery - Calculation of size required
To decide what size (capacity) battery we would require we made a list of the electrical items and their power consumption and did some calculations. One can't really avoid this step to be confident the battery installation will do the job. Until we knew what size of leisure battery we would need, we could not decide on a suitable charger or battery cable sizes.
Here's our basic list using manufacturers data, but with our calculations:
| Item | Watts | Watt-hour | Number of hours on |
Watt-hours in 24hrs |
Amp/hours | Notes |
|---|---|---|---|---|---|---|
| Fridge | 48 | 16 | 24 | 384 | 32 | 1 |
| Pump | 54 | 0.9 | 24 | 21.6 | 1.8 | 2 |
| LED Light (lounge) | 3.5 | 3.5 | 4 | 14 | 1.16 | |
| LED spotlights | ? | 1 | ||||
| Light (kitchen) | 11 | 11 | 1 | 11 | 0.9 | |
| Light (toilet) | 11 | 11 | 1 | 11 | 0.9 | |
| Water Heater | 4.3 | 4.3 | 1 | 4.3 | 0.36 | |
| Warm Air Heater | 20.4 | 6.8 | 3 | 20.4 | 1.7 | 3 |
| Total | 466.3 | 38.8 |
Notes:
1. Waeco Fridge has average power consumption of 48 watts.
However, once fridge is cold, the compressor only runs about 15-20 mins per hour (this from our observations), so that's equal to one third of an hour =16 watt-hour
2. Water Pump: has power consumption of 54 watts.
However, a water pump only runs for, say, 1 minute per hour total (when there is no shower fitted), therefore 54w divided by 60 mins = 0.9watt-hour.
3. Warm-air heater - we assume it only runs for 20 minutes total in each hour, switching off when room thermostat heat setting is reached. (Heater uses 1.7Amp on gas setting, 2.2Amp when on 240volt).
The water tank gauges and hob/oven ignition are momentary loads and not significant, so we have not included them in our calculations
To find the total Amp/hours used by our electrical items is: Amps = Watts divided by Volts
Thus Amp/hours will be: 488 watt-hours divided by 12volts = 38.8 Amp/hours
If this is anywhere near correct, a single battery of 110 Amp/hour capacity would give us just under 3 days (39amp/hours per day x 3) - in theory! However, the actual capacity of a battery is often much lower and is dependent on its state of charge, the ambient temperature, its age, etc. In addition, a leisure battery should never be discharged below about 50% capacity, so we really only have about 50Ah max, which is just over a day. If we doubled up and had two brand-new and well-matched 110amp/hr batteries connected in parallel running at about 77 deg F. (25 deg C.), we should have 220amp/hours max, giving around 100Ah useable power, which gives us just over 2 days.
We have regularly obtained 2 days and 2 nights running purely off our batteries. This in warm climates where the ambient temperature is around 25deg.C. The typical readings at the end of the period, with the batteries still on light load, indicate they are still about 50-60% charged.
Providing it's not too hot, by turning the fridge control down to a point where it still remains cold, but with the freezer compartment only just functioning, it is possible to increase the time to three nights without the batteries falling below 50% charge. In all, it appears the calculations are not far off!
• Update October 2013. Having now fitted the solar panels the number of days the batteries will last has changed significantly - see the Solar Power Section for details.
Cable Sizes
| Code letter in Schematic diagram |
Cable | Size | mm2 | Note |
|---|---|---|---|---|
| 'x' and 'y' | All cables linking Van Battery, Sterling Charger and Leisure Batteries |
315/0.40mm | 40 | 1 |
| 'a' and 'b' | All cables linking Leisure Battery to Master switch and Fuse box |
80/0.40mm | 10 |
Note 1. These cable sizes are a little larger than the 35mm2 cable recommended by Sterling (for the cable lengths we have). We could only find 40mm2 cable at the time. Using larger cable sizes is fine, providing one can find suitable fuse holders and ring terminals to suit.
Fuse Box cable sizes and fuses
| Item | Cable Size mm2 |
Fuse Rating Amp |
Note |
|---|---|---|---|
| Fridge | 6 | 15 | 2 |
| Pump | 2.5 | 10 | 2 |
| Water Heater Control | Manf. harness | 3 | |
| Warm Air Heater | |||
| Ceiling Lights | 1.0 | 5 | |
| Water Tanks | 2.5 | 5 | |
| Gas Hob | 2.5 | 3 | |
| Oven | 2.5 | 3 | |
| Other Lights | 1.0 | 5 | |
| Catalytic Conv. alarm | 1.0 | 3 |
Note 2. to avoid voltage drop - these cable sizes dependent on length of cable between battery and appliance
For a useful on-line calculator to help work out the size of cable required to avoid voltage drop,
click here: Antares.
Control panel

All the on/off switches, tank gauges, heater controls etc., are fitted on a simple ply panel above the sofa/bed.
All the lights have their own integral on/off switches, but can also be turned off using the one switch on the panel.
The inexpensive plug-in mains tester indicates any fault in the campsite mains supply, such as reverse polarity, or missing earth, and can also be used to test all the other socket outlets in the van.
In our simple 12volt installation, the van and leisure batteries are kept entirely separate; the van starter battery cannot be used to power the fridge or any other 12volt item installed. Similarly, a mains garage unit with Residual Current Device (RCD) and Miniature Circuit Breakers (MCBs) wired to sockets maintains a separate mains supply from the campsite bollard.
Should the charge in the leisure batteries drop to 50% (around 12.4 volts), then we either have to manually connect the 240v mains charger, or run the engine to use the Sterling B2B output. In this instance we assume the solar panels are not producing a useable output.
There are alternatives to having a bank of switches, meters and lights mounted separately on a panel in this fashion. A look at Pro-converters vans will show what is available - although some systems will be expensive and may be difficult for a self-builder to obtain and install.
We like the simplicity of discrete items - if anything fails we can easily find and isolate the problem. Complex systems which combine services with displays and touch screens, that include power supplies, charging, fusing, etc., are all very well - until they go wrong....
Sterling Leisure Battery Charger

The heart of this system, along with the battery, is the Sterling Battery to Battery (B2B) charger. This is a clever, if expensive, item (but then it was developed for the marine environment so should be reliable). Simply, on start-up the charger monitors the voltage of the van starter battery; if there is insufficient voltage present, then the charger will just continue to monitor, but not try to charge the leisure batteries. If the van battery is near fully charged (or once it has been charged sufficiently by the van alternator), the B2B charger will switch on and, if necessary, fast-charge the leisure batteries. Once the leisure batteries are near fully charged, the B2B charger will continue to monitor their state and maintain a normal float charge, but not allow the leisure batteries to be overcharged (in our case to exceed 14.4 volts max.). The unit has many features so for a full description of the B2B charger see the Sterling web site (link in Sources).
• Update. It is important to note that whilst the Sterling charger will very quickly fast-charge a leisure battery that has been discharged overnight, the leisure battery will not be fully charged after say only an hour, and it will take several more hours of motoring to fully charge the batteries. This is because of the staged charging method used by the Sterling charger. How long it will take will of course also depend on the capacity of the leisure batteries.
Thus when one is touring and only driving between campsites for, say, two hours a day, the leisure batteries are unlikely to reach a fully-charged state. This is probably ok for one night stops in a cool mid-summer where the fridge is only ticking over, the lights are not on for long, and the space heater off; but if one stays longer, the batteries are quite likely to discharge much sooner than expected. •
On the front of the B2B charger casing is a group of small LED lights which show the state of the batteries and what the charger is doing at any particular moment. As can be seen in the photo, our charger is fitted in the sofa/bed base unit, so these LEDs are not normally visible. It had to be fitted here as this was the nearest location to the van starter battery and so keep the positive cable connection short to avoid voltage drop.

To make life easier and readily check the state of the batteries, we installed a Sterling B2B remote unit on the control panel above the sofa. This has proved extremely useful. In addition to the LED lights on the front, button switches with a small screen display shows the state of the van starter battery and the leisure batteries and, if the engine is running, what charging, if any, is in progress. An alarm will sound if the leisure battery drops below its minimum operating voltage.
The remote unit tells us all we need to know: will the batteries stand another night without being charged?

Pic shows the Bosch S5 100Ah van starter battery and positive and earth cables going away to the Sterling B2B (note the Fiat fuse box cover has been removed temporarily). The leisure batteries (negative) earth cable is connected under the same earth bolt (black arrow) as the van battery negative cable. The positive cable 70amp fuse is located close by in the sofa base; there wasn't any way to fit it closer to the van battery.
Note. Usually, the negative cable on a leisure battery is run to a nearby convenient spot on the van bodywork and earthed using a ring terminal, screw and shakeproof washer. In our case the van's starter battery earthing bolt was the closest point.
Fast chargers - a warning!
In the Waeco Fridge documentation it states: "disconnect the fridge ... from the battery before connecting the battery to a quick charging device. Overvoltage can damage the appliance electronics."
Clearly, we could not do this as the battery, Sterling B2B charger and fridge are all hard-wired together! We rather wanted the fridge to work when we were driving along...
It is not stated in the Waeco documentation, but the max. voltage the fridge electronics will stand is 14.8 volts (source Dometic tech. support). As the Sterling B2B has a max output 14.4 volts when set for sealed lead-acid batteries, we did not have a problem. One would need to take care if attaching some other fast-charger with unknown output when running from a mains supply. The Master switch could be used here to isolate the fridge temporarily.
12 volt Fuse Box

The 12v fuse box takes up to 12 car-type blade fuses (in two banks of 6). The box is rated at max 30Amp per fuse, 100Amp per bank of 6; it also has provision for 12 negative cable connections via a common connection strip located at the top of the box. It is surprising how quickly these fuse boxes begin to fill up with live circuits!
Whilst the terminals in the fuse box are all fitted with screws with shakeproof washers, we added blade-type connectors (a fixed one under the screw and the 'flying' other half soldered to the cable), this so cables can be easily removed/replaced in the fuse box as they have very fiddly little screws that are easily dropped then roll into voids and get lost forever! An exception to this was the fridge cable where we used a soldered ring connector under the screw to get maximum surface area connection (me being paranoid about voltage drops on the fridge feed cable!).

In all, this dinky little fuse box is a very useful item as it keeps all the connections together and saves having separate earth blocks for the negative cables. See Sources for suppliers.
Master Switch

The Master Switch is worthwhile in that one can completely isolate the fuse box (and its associated van circuits) from the leisure batteries in the event of a appliance fault, blown fuse, cable defect, etc. Also, when connecting the battery charger to trickle charge the leisure batteries when the van has been idle at home (or to top the batteries up on-site), then the master switch will isolate the van electrics from the high charger output.
Ideally, the master switch should be in a location where it is easy to operate. We've rather hidden it away in the sofa/bed base
12v Fuseholders
