
- Home
- Making a start
- Design & Planning
- Windows & Rooflights
- Insulation & Flooring
- Furniture
- Beds & Seats
- Kitchen
- Washroom
- Electrics
- Gas
- Water
- Heating
- Lighting
- Security
- Accessories
- Sources & Suppliers
- Cost Guide
- Specification
- Tools-Materials-Methods
- About Us
- Gallery

Mileage travelled:


Site News
Furniture
Choosing materials
There is quite a bit of furniture to make: beds, kitchen unit, wardrobe and washroom partitions, overhead lockers, cupboard doors, drawers and so on! The weight of this lot does add up to quite a dent in the van payload, so it pays to build light if one can.

The are many different materials that can be used, but for the main constructional items it comes down to what is manageable if one isn't a cabinet maker, what is affordable, what is obtainable locally, and, a luxury for a self-builder: personal choice!
Most pro converters use lightweight ply boards, these can be ply based wood veneered boards, or boards with a vinyl-like surface. Vohringer lightweight 8x4ft. 15mm thick boards with veneer both sides retail around £140 each; the 3mm thick boards with one veneered face are £63 at time of writing (Feb 2012).
These prices were beyond us so we looked for alternatives. We do like real wood panelling, unfortunately 3.5mm veneer-faced plywood is not cheap either (ours was £32 per sheet), but if we've got to sit and look at it for days on end - then so be it!
• Update, January 2014 . For the new design washroom/wardrobe partitions, and some other items, we purchased three 2440x1220mm (8x4ft) cherry-veneered 4mm ply panels; these cost £42.50 inc vat and delivery. Veneeered ply is becoming difficult to source, most suppliers could only offer 4mm veneered panels with MDF backing. [We dislike MDF, not only because it is heavy, but because of the dust it creates when sawn; plus it absorbs moisture, if not carefully sealed.] •
The versatility of plywood
There are many possibilities when using ordinary ply. It can be painted, wallpapered, covered in carpet or vinyl, stained or varnished. Birch ply which usually has a good knot-free fine grain surface looks good stained and varnished. Ply sheets with a thin vinyl sheet covering can be bought from specialist suppliers like Magnums (see Sources).
Construction methods - fixed frames or modular units?
Many self-builders do the wood constructional work in the van, usually making frames and partitions in-situ then covering these in ply, or fitting lightweight panels directly in place. Of course, if you don't have a shed or garage to work in you've little choice but to do it this way; it is also probably the quickest method as there's no ineffective time walking back and forth to the garage or shed.
We chose to make all the furniture as stand-alone units, each made up in sections, and then assembled in the van. By screwing and/or bolting everything in place, it meant we could move things about or alter them (well, that was the theory). By using this approach it also meant we could do the work in the shed in the warm during the winter - the interior of an uninsulated, unlit, empty, deep red painted van is a most depressing place on a freezing January morning.
Construction methods - single ply sheet on softwood frame
Whilst we have built 'normal' furniture before, mostly using chipboard, plywood and softwood, we hadn't tried lightweight construction methods. So we experimented with making a minimalist wheel-arch box.
This is about as light as one can go, a single sheet of 3.5mm cherry veneered ply pva glued to a light 28 x 18mm softwood frame. It works, it's adequate, BUT it is very susceptible to temperature change and although it may all be perfectly flat and square when first installed, after a cold night then a hot day, the once beautiful box can end up with wavy surfaces and twisted framework.

However, by increasing the frame timber to 44x18, stronger, acceptable lightweight panels can be made fairly easily and quickly. We have used this method for the sofa and seat/bed bases and fronts, kitchen panels, and washroom/wardrobe partitions and overhead lockers. The frame joints are simple half lap joints.
The larger panels have intermediate braces, so substantial enough to not warp, or allow the ply panelling to 'drum' when on the move.
With woodscrews fitted into clearance holes pre-drilled into the softwood frame, these frames can be fixed together without the need for additional plastic fixing blocks.
If a ply covering is required on both sides, then the second panel can be either be glued or screwed in place.


In the pic, the hardwood strip at the joint where the outside faces of the wardrobe front and long side panel meet. Adding a separate strip to the edge of a ply and softwood panel, or at a join where two panels meet, is a neat way to hide the plywood edge.

Construction methods - hollow panels

Some panels required veneered ply on both sides.
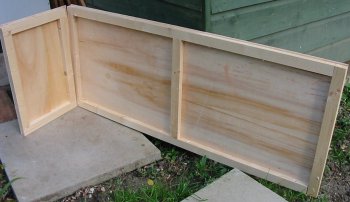
In the pic, the sofa bed end panels are being constructed, here we glued two sheets of veneered ply back to back with a 25 x 10mm thick softwood supporting framework sandwiched in-between the sheets. Additional strip spacers were added about every 300mm. Providing the ply sheets were flat in the beginning, and good straight softwood was used, the resultant panel remained flat. A matching cherry veneer strip was later glued to all the visible edges.

The main disadvantage with the hollow panel is that where any fixings are made on, or through, the panel, one has to ensure there is an internal strip of supporting wood in the right place!
In the pic the overhead locker end panels have additional strips added to take the locker front and base frames fixing screws.
Making a hollow panel can be time consuming. The stripwood has to be cut to size then glued to one panel, nothing can be done now until the glue has dried (usually overnight if one has used pva). Then the other panel is glued in place, and when that has dried, the edges planed, edging strip attached and sanded to size, then the whole lot varnished. Quick - it ain't!
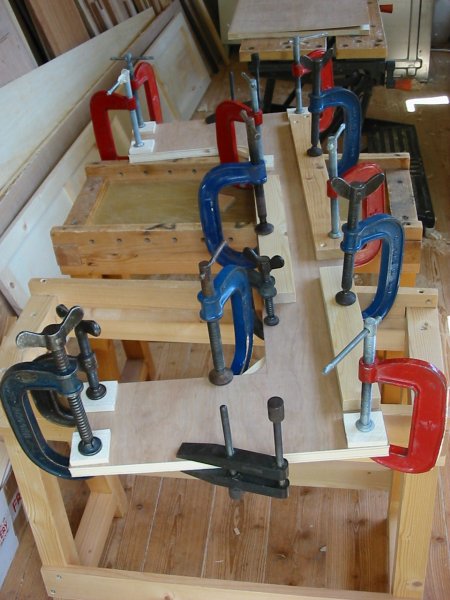
• Update. Oh dear! Don't let this pic put you off building hollow panels!
Normally one really doesn't need this many clamps, this just happened to be the first bed leg we made and we glued the softwood strips with pva, which can take a few hours to dry if it is cold; we were being over cautious.
We did in fact use contact adhesive (Evostik Impact) to fix the strips on most of the double skinned panels. This speeded up the process no end (and doesn't usually need a lot of clamps!), but we do leave the assembled panel overnight before planing and applying edging strip.

This method gives a light, strong and attractive panel and we have made most of the panels and doors this way, although the larger doors do have wider strip.
Since these items were made they have survived hot summers and cold nights without any noticable change - if anything is going to warp it will be the doors.
Construction methods - laminated panels

Partly out of curiosity, we went to the other extreme by gluing a sheet of 3.5mm veneered ply to a 12mm sheet of ply using contact adhesive. This works, but is also prone to warping with temperature change, particularly if unsupported. Ideally, one needs to balance the 12mm plywood 'core' by gluing a 3.5 mm ply sheet to both sides.
But, with just one thin ply sheet glued to the 12mm base, the construction is very heavy - double the weight of the hollow two-sheet method above. It's also very expensive in materials. Not recommended, although one could try 9mm ply in place of 12mm to make it lighter.

We were going to use the laminated ply method for the kitchen unit end panel that adjoins the seat. Here we anticipated having a lift-up flap to extend the worktop, but were unsure of the position of the support bracket, so a solid panel would have saved trying to guess where to put internal supporting strips.
In the event changing to a compressor fridge and being able to fit it on the same side as the sink and hob under a longer worktop made a lift-up extension unnecessary, so this panel was replaced with a much lighter hollow double-sided one.
Construction methods - Plain ply panels

To return to where we began, the nearside wheel arch box was finally made in 12mm ply and is lined inside with insulation. If 12mm ply seems overkill (and would be if that's all the box did was to hide the wheel arch and keep it warm), but it now forms part of the kitchen unit and takes the weight of the heavy oven
Plywood - points to watch

In our local diy stores they sell ply sheets in various sizes and thicknesses. Whilst they proport to be 'WBP' (Weather and Boil Proof) or 'exterior grade', often these sheets have no markings or stamp showing the plywood's origin, or to which specification it has been manufactured. If this is the case, we would avoid ply from these sources on two counts. It is very likely if these sheets get wet, just once say, they will begin to delaminate - the plies will come apart at the edges. Also, they will almost certainly have voids internally - gaps where joins in the inner plies don't butt up to each other.

If one uses plywood sheets for the van floor, there is every chance, at some point, it will get wet, or one will want to fix screws into it. Structual plywood from the local builders merchant, or timber yard, who have been in business 100 years is the place to go. Look for the stamp, the most common Spruce or Birch ply used by builders will have "BB" stamped on it with the origin and specification, probably BS5268.
This ply will survive getting wet, it may stain the board face, but won't easily delaminate. Similarly, it may have voids but these should be very small and usually not a problem.
For peace of mind - test a sample. Boil a litre of water in a jug, take jug off heat and pop a sample piece say, 100x50mm into it and leave overnight. In the morning take out the sample and leave to dry out naturally. If the ply is any good it should only have some watermarks/stains on the faces and the plies should still be firmly glued together. Higher quality ply will stand being in boiling water for an hour.

If anyone offers 'marine ply' at knock-down prices, ask to see a stamp like this one!
For some very useful information on timber and plywood try the Trada website, link in Sources page.
Assembly - keeping things square

When it comes to fit the various furniture units we have used the van floor as the datum surface. For everything that fixes to the floor that has to be square or vertical to it (such as the kitchen unit), we used a large builders-type square. This is just three strips of good straight wood screwed carefully together to form a right-angled triangle, the side lengths being multiples of 3, 4 and 5 (salute Pythagoras!). Using a square this way means we don't have to worry about the van, or floor, being level with the ground. In fact, we don't use a spirit level for levelling, just its straight edge as a long rule for drawing lines on plywood.
