
- Home
- Making a start
- Design & Planning
- Windows & Rooflights
- Insulation & Flooring
- Furniture
- Beds & Seats
- Kitchen
- Washroom
- Electrics
- Gas
- Water
- Heating
- Lighting
- Security
- Accessories
- Sources & Suppliers
- Cost Guide
- Specification
- Tools-Materials-Methods
- About Us
- Gallery

Mileage travelled:


Site News
Kitchen

Although we like a meal out occasionally, we also like to cook modest meals - essential if wild camping in remote places.
We have a Smev 3-burner gas hob, small 20 litre gas oven with grill, 80 litre compressor fridge and good size sink/drainer and worktop for food preparation and clearing the mess up afterwards.

The kitchen unit measures 22in. wide and 72in. long; just about half the available interior length.
We still have some work to do making drawers and cupboard doors, but the kitchen functions well without them!
Kitchen Unit Construction
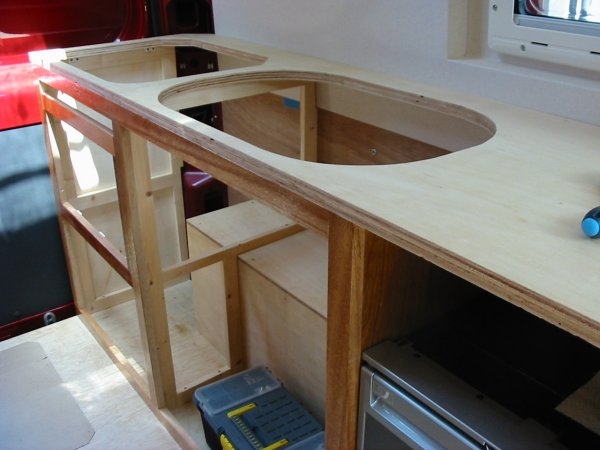
The basic kitchen cupboard comprises:
a 50x25mm mahogany front frame with glued half-lap joints, (although I confess there are a couple of haunched mortice and tenons in there somewhere);
a 44x18 softwood end frame (by rear door) with veneered ply on one side;
an intermediate open framework which, along with the strong ply box covering the wheel arch, supports the oven shelf;
a softwood frame to the left of the fridge with veneered ply on one side.
Screws in pre-drilled holes in the frames hold the unit together and fix it to the floor and wall.
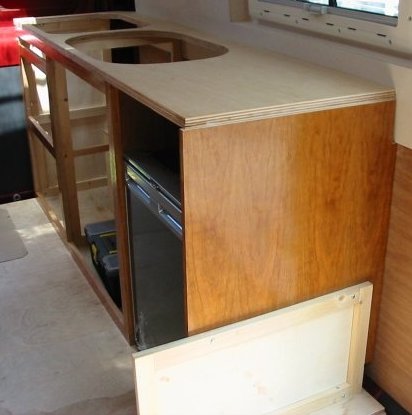
To the right of the fridge is a veneered ply panel which boxes in the fridge and supports the worktop. This is veneered on both sides for strength and is partly visible from both sides (unlike the cupboard panels). This end panel is also bolted to the seat box to allow it to be removed, along with the seat box, should we need to remove the fridge (see below).
The worktop is two pieces of 12mm ply glued together; it needs to be about 25mm thick to give rigidity.
Details on making and laminating the worktop here

The Smev hob and sink have fixing clamps underneath which suit this thickness top.

Plastic demountable blocks hold the worktop in place and make it easy to remove.
Fridge Access
Originally, we planned to use a 3-way gas fridge on the offside of the van, however the difficulty of boxing this in to seal it so the combustion gases did not enter the interior, made us consider alternatives (see Planning Section). We decided a 12 volt compressor fridge would be a better choice as it did not require vents and could be fitted under the worktop.
As a consequence of changing the fridge, some problems arose which needed to be solved. The fridge is deeper than the gap between the kitchen unit and the toilet partition, so it won't come completely out if one pulls it forward. We can take it out sideways, but it means the small seat/bed box and fridge end panel have to be removed first. We used captive nuts with bolts in the end panel, not only to secure it to the seat box, but make it simple to remove. Also we could not now fit the fresh water tank in the seat box as having to remove a tank as well in order to remove the fridge would just be too much work. So, the fresh tank went under the van floor.
Waeco Compressor Fridge Operation. Importance of Ventilation
Update, June 2013.
There is no doubt in our mind that the modern 12volt compressor fridge is an excellent appliance; we are very pleased with ours. Working on just 4amps average supply, with no gas (and burner cleaning regime), or external vents through the van body, or having to keep the van level for the fridge to work, they are just about fit and forget.
On very hot days, however, the fridge can struggle to operate within its parameters. Once the ambient temperature nudges towards 35deg.C. the fridge freezer compartment may begin to defrost*
A red warning light usually appears on the fridge to indicate all is not well.
Although behind the fridge there is a gap between the back and ply wall panel of about 70mm (Waeco specify a minimum air gap of 50mm) and there is a large gap between the fridge top and underside of worktop to let warm air escape, this has proved inadequate; probably because the fridge sits on the van floor and very little cooling air can be drawn in under the fridge body to flow up the rear and out the top.
To try and improve matters we are going to raise the fridge up on a 12mm ply sub-floor and see what effect that has. Many self-builders also fit small, inexpensive computer fans to assist the air flow. All these things only work providing one can shift the hot air out easily, so a good clear exit path is necessary.
* A freezer compartment that defrosts - then refreezes once the ambient temperature has dropped - can easily go un-noticed (the warning light will extinguish once the fridge is operating correctly), particularly if the weather is fine for a few days in a row, and one is enjoying salads and has not used the contents of the freezer. This has obvious dangers; eating re-frozen foods is a bad idea! We have noticed on occasion that the cardboard packaging on frozen food has become wet and limp, rather than brick-hard and coated in thick frost as it should be - this is a good indicator that the fridge has been struggling.
Update. Kristy O'Laughlin sent us this great tip for monitoring the freezer operation: Fill a small bottle 1/2 full with water and lay it on its side and freeze it. Place it upright in the freezer and you'll be able to tell if your freezer has defrosted by seeing if the water has shifted! Happy travels!
Gas Hob

The Smev 3-burner hob has four fixing brackets, one at each corner underneath the top; they clamp to the worktop when the fixing screws located in the top are tightened - a simple arrangement. The gas connection is underneath near the front on left side. Like the oven, making the hob gas pipe connection required some thought. Fortunately, with the hob in place, there is just room to access the joint in the gap between hob and oven. The 12 volt supply cable for the spark ignition is connected underneath at the back and very awkward to reach with the hob in place.
We have used the hob quite a bit now and found it works very well and is easy to clean.
Sink/drainer

Also a Smev item, this has a similar fixing arrangement as the hob. The hole(s) for the mixer tap have to be made; we used a Bosch cutter with pilot drill in a mains powered drill (although thin material, it is hard stainless steel so used some oil lubricant on the cutter). Fortunately we saw a photograph (possibly CAK Tanks brochure) showing this particular mixer tap installed in the sink. There is just room to fit the tap and for its spout to fold down into the sink so the glass cover can sit flat. We place a tea towel under the glass lid when travelling to ensure nothing rattles.
The drain plug outlet is 20mm (3/4in. hose), water runs away quick enough.
Oven/grill

The Smev 20 litre oven is large enough to take a medium size joint and, like the grill, works well once properly warmed up - it takes a good ten minutes for the grill and 15-20 minutes for the oven. A check on the oven temperature at 200deg.C showed it was only 3degrees inaccurate.
The 12 volt power connector for spark ignition, and gas inlet pipe connections are located at the back, bottom right corner (viewed from front), fortunately we can reach these from inside the cupboard. Making provision for these connections takes some thought; if one couldn't get to the gas and 12 volt connections with the oven in place, then it would be necessary to leave a loop of pipe sufficiently long enough to make the connection with the oven pulled out from the cabinet.
Oven Fixing
The oven sits on a 12mm thick ply shelf, supported at the front, sides and the rear, where a strengthening strip of wood runs across the width; this strip sits on top of the wheel arch box which takes most of the weight of this heavy item. For its fixing the oven is supplied with four polished, stainless steel angled strips that make up a facia for fixing into the front face of the cabinet.
The strips are fixed to the oven casing with small self-tapping screws and collars (supplied) that screw into plain holes. This casing is actually two layers: one layer is the outer plated steel case, the other layer is part of the very hard stainless steel oven front. The tiny self-tappers are not up to the job and will simply jam solid about one-third of the way into the hole - any attempt to go further resulted in the head of the screw being mangled.
Suffice to say we got rather fed up with Mr Smev and his daft, cheap methods. Why they could not put a threaded bush in the casing to take a proper small machine screw is beyond us...
After careful inspection, we drilled out the casing holes to match larger diameter quality stainless-steel self-tapping screws that were capable of cutting a thread in the hard casing without the possibility of jamming. Yes, we've probably killed the warranty off...
We are not entirely convinced the oven fixing is adequate. It is a very heavy object, other than the front fixing described above, there is no other fixing to secure it. We have in mind to fix a strap of slotted steel strip looped over the oven case at the rear and anchored to the cabinet.