
- Home
- Making a start
- Design & Planning
- Windows & Rooflights
- Insulation & Flooring
- Furniture
- Beds & Seats
- Kitchen
- Washroom
- Electrics
- Gas
- Water
- Heating
- Lighting
- Security
- Accessories
- Sources & Suppliers
- Cost Guide
- Specification
- Tools-Materials-Methods
- About Us
- Gallery

Mileage travelled:


Site News
Essential Equipment and Accessories
Essential Equipment
Here some items required by law in some countries, and some we considered were essential to have, not only for safety, but to make our van function. Also some accessories to make life a little easier. Old hands will know all about these, and probably have other items too. Of course, it will also depend on what items you have fitted on your van and where you go.


Compulsory in many mainland European countries are the hazard vest and warning triangle and spare headlamp bulbs etc. Check with the RAC or AA for latest info - it changes often.
Beware Spain requires TWO warning triangles and a hazard vest for driver and passenger, plus a spare pair of spectacles, if needed, for driving. Do keep the hazard vests to hand in the cab; one can be fined in Spain for not wearing the vest when getting out of the vehicle if broken down.
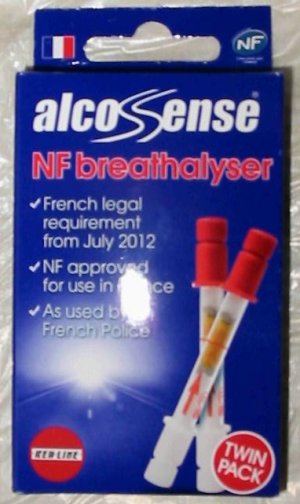
French Breathalyser. From July 2012 all vehicles travelling in France have to carry an NF approved alcohol breathalyser. Whilst the French Police are no longer issuing fines for not carrying a breathalyser, it is still a legal requirement to carry them (yes, I know it's daft, but it's France....)
This pack contains two breathalysers; if the driver uses one to test, then there is still one left in the vehicle. These can be obtained from ports, French supermarkets and pharmacies, Halfords, etc.
Note the breathalyser pack has an expiry date, so worth a check when buying.

Box contains spare fuses for all the appliances, 12v. fuse box and battery wiring fuses, plus spare headlamp, side/brake and indicator lamp bulbs.

If carrying a bicycle in Spain or Italy a hazard board must be fitted. In Italy, the board must be made of aluminium, see Fiamma stockists.

Headlamp deflectors/protectors. When driving on the right it is necessary to deflect the headlamp beams. In the old days one could stick bits of black tape onto glass headlamps, but these days the plastic headlamp 'glass' doesn't take kindly to this simple solution, so we are told. These moulded plastic protectors with self-adhesive black masks can be obtained and fitted over the headlamp. One can remove the black shapes afterwards and keep the 'protectors' in place.
Details on fitting and removing deflectors here

Low Emission Zone badges in the windscreen. Top one is a French Crit-Air badge. Lower one is a German Umwelt Plakette. Both can be bought in advance, see France and Germany sections in the Gallery for details.
Accessories

Carbon Monoxide alarm. Although the smaller rooflight has permanent ventilation built-in and we never cook on the hob or oven without the smaller vent being open, plus the gas-driven water and space heaters are room sealed, things do go wrong. Carbon Monoxide is a killer, so this is one alarm a van should have. We have stuck red tape over the flashing LED test light as it flashes on regulary and, at night, it is very bright and does a great impression of a lightning storm going on outside! We can test the alarm by pressing the button - it emits a loud beep.

The ubiquitous smoke alarm.
These two alarms are not expensive and most diy stores have them. One can buy expensive all-in-one alarms that detect all sorts of gases supposedly threatening the motorhomer, but we haven't bothered with those.

The cab windscreen insulating system, or "Silver Screen" to give it its usual name, not only helps keep the van interior warm at night (and so prevent condensation forming on the inside of the windscreen), but also helps keep the interior cool during the day in hot sunny climes. This Silver Screens model has strong velco strips that allow the front section to fold down so, in daytime, let more light into the cab (and let you see out the front) if the sun isn't full on.
If you like sleeping on the level then two plastic wedges are essential (only one needed here).
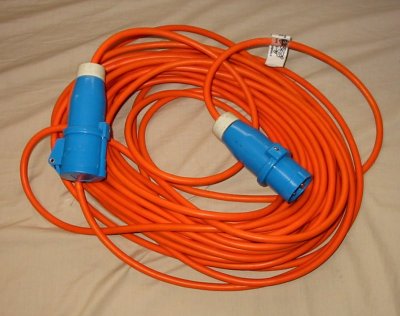

Orange mains hook-up extension cable, 2.5mm sq. x 25m. long. Plus a shorter one about 8 metres long - this one very useful when the campsite mains bollard is close to the van (blue cable is easy to distinguish from orange when stuffed in a cupboard).
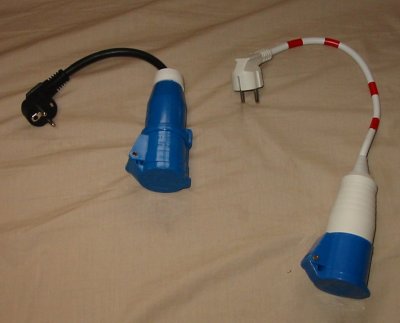


A selection of Mains Power Adapters.
Left: a standard 'Continental' mains adapter (essential to have in France, Spain, Germany...). The red/white cable is same type adapter, but with the polarity of the live and neutral conductors reversed (also occasionally required).
Whilst one should not come to any harm if you don't use a reversed adaptor, some equipment may not function properly.
Centre: a 13amp household plug adapter. Useful for connecting mains power to the van at home, or when camped on a friend's lawn - they'll be so thrilled at having you they'll not notice your using their electricity.
Right: a recent addition. UK-type connectors at each end, but with live and neutral conductors reversed - we've found an increasing number of sites in France and Spain are using the large blue connector, but many have reverse polarity - so we made this adapter up. We could fit a reversing switch inside the van with a warning light etc, but this is simple.
When using any of these adapters we always make sure to keep them tucked up inside the site bollard box in case of rain as the connectors are not waterproof when joined together.
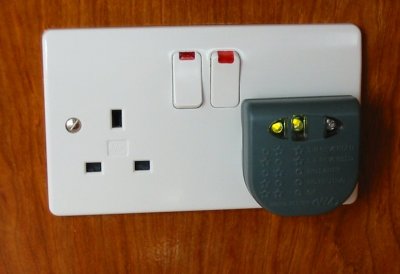
Vital item to have: mains polarity tester. Useful as it indicates polarity, but more importantly, it checks for earth continuity - avoid bollards with no earth connected (fortunately, a fairly rare occurance in our experience).
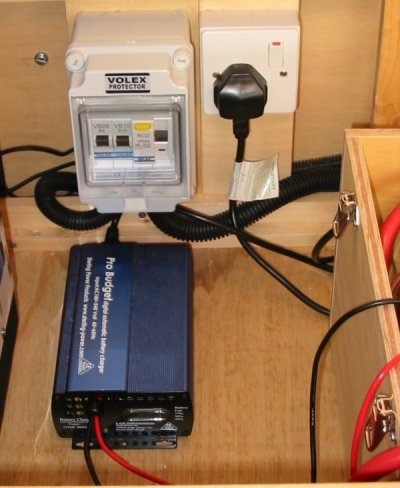
We have not fitted a mains battery charger in the van as a permanent fixture. It is an essential item though. Although we now have solar panels, and when not on the move our batteries usually receive sufficient charge, there may be occasions when a mains charger would be handy to have. We keep ours 'loose' so we can charge a battery away from the van, or it may help another camper with a flat battery problem.
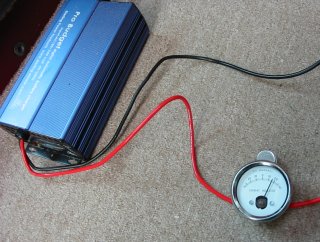
A great accessory for the 'Control Freak!' An induction ammeter. Measures the current (amps) flowing in any cable. It simply clips on a cable without damaging it. Useful if you want to check the actual current flowing, rather than just relying on, say, an LED to show something is working - in this case it is showing the charge going into the leisure batteries from the portable battery charger. If one observes this intelligent charger long enough one can see how the output changes, in steps, over time - who said we don't know how to have fun...? See Sources for a supplier. This one will show range 0-30 amps.


Fresh water tank, food-grade flat filler hose. One on left is about 4 metres long, one on right, 25 metres long. Our fresh water tank is under the van floor, it is filled from a locking filler on the nearside of the van. Whilst these hoses do work and do roll up very small - they are a bit of a nightmare in that it is almost impossible to drain all the water out of them after use. Even though we hang them up over the rear doors for hours, then squeeze them flat, roll them up and unroll them repeatedly, for days after little pools of water will be found in the bags we keep them in. We've given up trying! So...
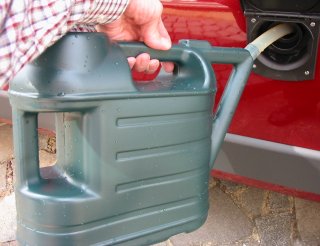
We saw someone topping up their underslung water tank with a watering can - great idea - we use it all the time and rarely bother with the hose. In fact, we stopped carrying the longer hose now. This inexpensive 6.5 litre can came from Homebase.
Update. One tip we've since read is to use an elbow from plastic rainwater pipe - this is fashioned with some packing (say self-amalgamating tape), if necessary, to fit firmly when pushed onto the inlet stub and pointed upwards (like a funnel) - water can then be poured in. One could save on using a watering can and just use a normal 5 litre water bottle or a collapsing 10 litre water carrier bottle - so saving more space!

An essential item. Just when you've settled down with a good book and glass of something - the waste water tank needs emptying. A small bucket that will fit under the drain tap means one can drain off the tank sufficiently to save having to move. Handy for other jobs too.
Folks who like camping in overnight freezing conditions often open the tank drain tap to let waste water flow directly into a bucket to prevent the water freezing in pipes.

Usually, at sites with motorhome facilities, it's just a case of turning on the waste water drain tap and letting the water out, but at some smaller sites it may be difficult to manoeuvre the van close enough to the drain cover.
This extension hose has a bayonet fitting which fixes onto the van tap/drain, we got our bayonet from CAK tanks - see Suppliers.

LPG filling point adapters. See Gas Section.

The 'Red Book'. Vital item to take - but, hopefully, never need! Contains all the manufacturers instruction leaflets: fridge, gas hob, water heater, fuse sizes, etc, plus 'phone numbers, web sites and so on.
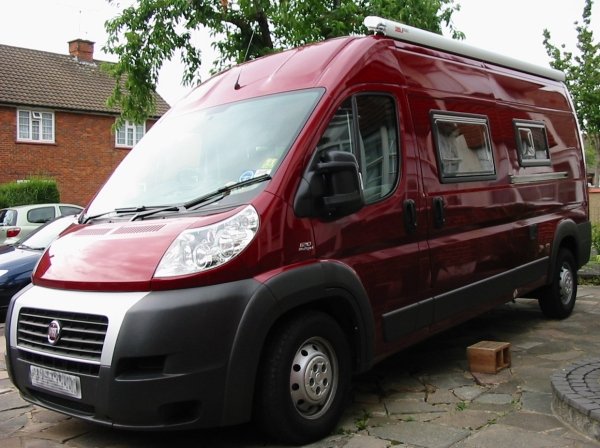
Wind-out Awning. Fiamma F65S 370 model. This version specifically for the Sevel X250 panel van. Note, there are different length awnings for short or long-wheelbase versions. Very heavy item (31kg.), for safety needs three people to lift into place. Unfortunately they don't do a Deep Red painted version!
Update. Usually, if stopped on grass, the two corner poles are fixed with long pegs hammered into the ground. However, when stopped on concrete it is difficult to secure the poles and not a good idea if it is at all breezy. Fortunately the awning is also supplied with two wall brackets that can be fitted to the van side - the end of the pole is then fitted to the bracket to secure it. We didn't fit these brackets originally, but having used the awning a lot in Germany on Stellplatz, which were mostly on concrete, we will be fitting the brackets.
Fiamma F65S Awning brackets (adaptors). Two are required (not supplied with awning) - rear one shown here. These are specifically for the X250 Ducato and bolt (and glue using Sikaflex) onto the existing roof fittings at the front and rear, so no drilling necessary. The grey hard foam strip is supplied with the brackets and acts as a water drip barrier.

2-bike rack. Fiamma Carry-Bike model 200 DJ Ducato. Fits onto off-side rear door, allows rear doors to open as normal. Max load 35kg. Mad Mumsie's electric bike weighs 24kg without battery fitted; my ancient 1950s ordinary bike weighs 11kg, so we are on the rack weight limit. Unfortunately lifting Mumsie's 24kg bike to a height at almost eye-level to fit it on the rack isn't on, so just my bike will be used at present. We could lower the rack, but it would require a separate towing number plate board with lights plus wiring, relay and plugs/sockets suitable for Fiat electrics.
With hindsight we should have gone for a towbar and hitch and towbar fitting bike rack which would be a much easier lift - although one would lose the option of opening the rear doors with bikes fitted. One can't win them all it seems!

If one is planning on staying anywhere near the coast for more than the odd night, then a windbreak is very useful and can make a big difference in comfort if one likes sitting outside.
Update. This is an Isabella Flex Grey Windscreen (note Isabella, the manufacturer, calls it a windscreen, whilst most Brits would know it as a windbreak). The standard model comes with three sections and is 460x140cm long. Single sections can be purchased separately to extend the length. It has short steel poles (about 300mm long) which are hammered into the ground as necessary; a long section of steel pole is then slipped over, the covers then thread onto the poles. 'Rafter' poles are threaded through the top of the covers to stop them from sagging. Guy ropes from the top of each pole keep the windbreak vertical in strong breezes. This a well-made item and should last a long while. Cost circa £240 for the basic 3-panel item, but, occasionally, deals offer an extra panel for not much more.
As this windbreak is quite heavy and fairly bulky we generally don't bother with it if we are just stopping for a night or two.
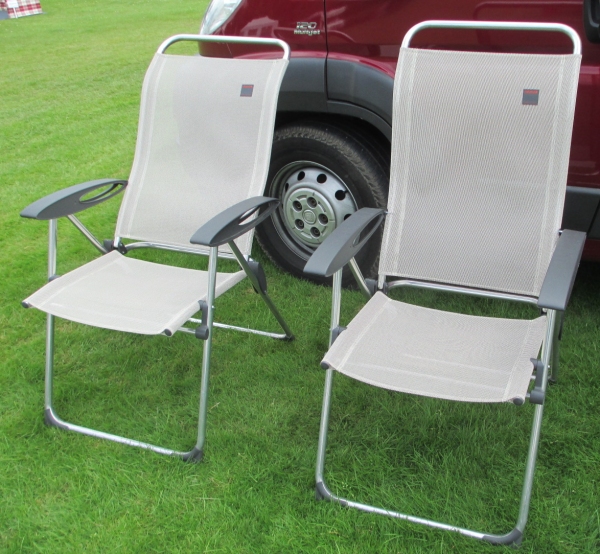
We have tried many garden chairs over the years, but none we've found can match these French-manufactured Lafuma brand 'Cham Elips' chairs for comfort. We can sit in these for hours on end; they are extremely light (2.5kg each) as the frame is aluminium, the 'cloth' is a type of woven plastic material and they can be left out overnight under the van without harm. Easy to store and not too bulky as one chair will fit inside another. Not cheap, they cost £75 each direct from the manufacturer (they have a UK outlet). Occasionally, they can be found at a discount at some suppliers end-of-season sales. If you prefer the full 'recliner' type chair (we don't have room to store those), Lafuma make those too.

We found the 'weather station' and thermometer very useful on our 'winter sun' trip. By knowing the temperature in the van we could make a decision on whether to bother with putting the convector heater on overnight. It was also of interest to know the temperature in the morning and observe the length of time the new Propex warm-air heater was taking on the 'gas' setting to warm up the interior. It's a gadget to play with...

Altimeter/Barometer. Whilst the Michelin maps are very good for giving general altitudes they are not specific enough. This little gadget which sits on the dash shelf (and no bigger than the van key fob) was pretty accurate. If you have a breathing problem, as I do, knowing the altitude can be extremely helpful.
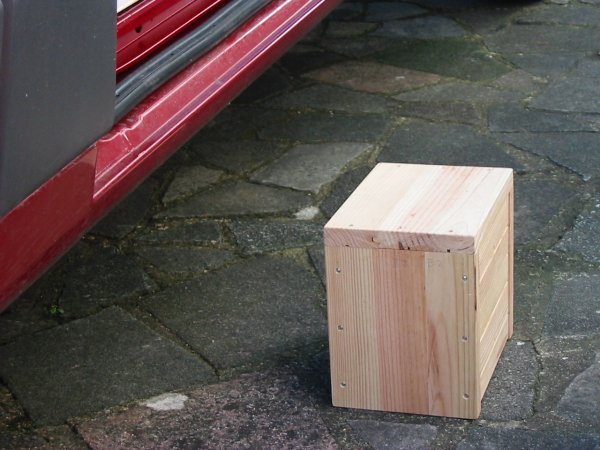
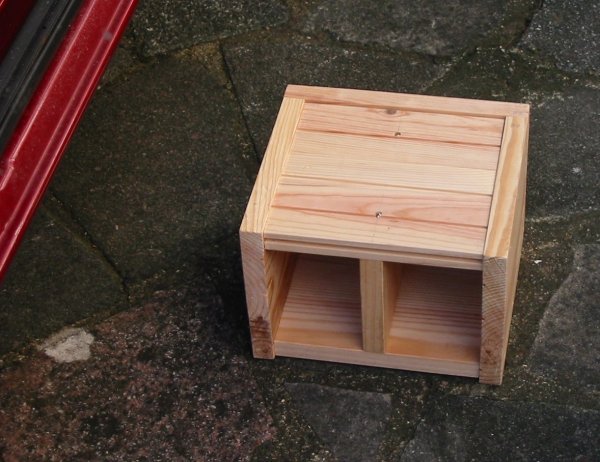
Wooden box 'step'. We knocked up this very simple, but strong, box right at the start of the build just to make stepping in and out of the sliding side door a little easier. It's also handy for Mad Mumsie getting into the cab through the passenger door. It can be used any way up, which gives three different heights. It's been so useful for all sorts of uses we take it with us - but not any more...

Update 1.
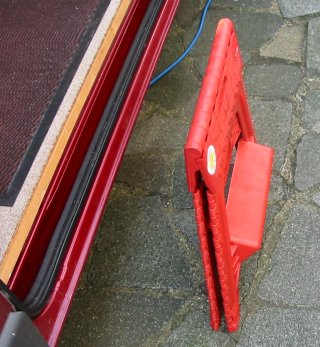
Mad Mumsie spotted this folding step in one of her many catalogues. It is much higher than the wood box and has two steps, making it much easier to get in or out the van from any door. It can be used as a small table - if one is that desperate. Yes, it is ugly, and it can give one a nasty pinch if one doesn't keep fingers clear of the joints when folding it, but she loves it - BUT NOT AS MUCH as the next one!
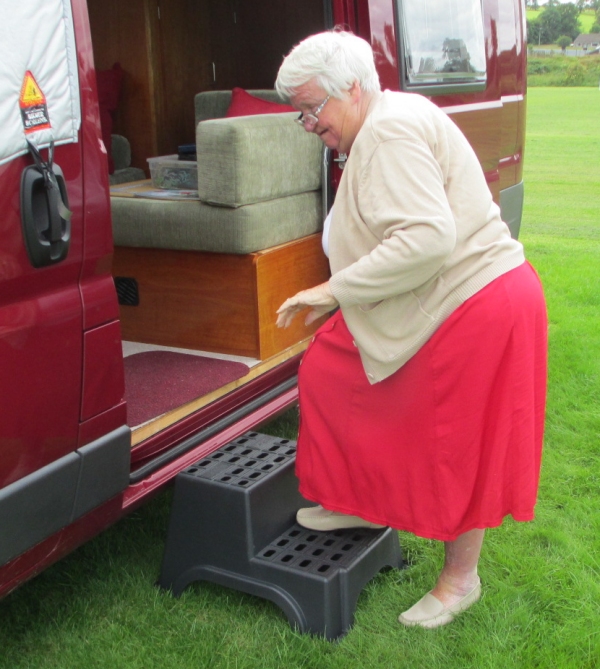
Update 2, November 2015.
Mad Mumsie has very bad arthritis in her knees, and whilst the red folding step above was ok, she found its lower step too narrow to keep her balance.
Then we found this Milenco double plastic step - it's rock steady with a big tread on both steps. Made in England (hooray!) from recycled plastic it cost just £19.94 from Towsure (see Sources for details). Having used it for some months now, Mumsie confirms she loves it best of all!