
- Home
- Making a start
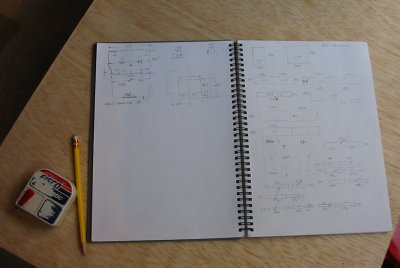
- Design & Planning
- Windows & Rooflights
- Insulation & Flooring
- Furniture
- Beds & Seats
- Kitchen
- Washroom
- Electrics
- Gas
- Water
- Heating
- Lighting
- Security
- Accessories
- Sources & Suppliers
- Cost Guide
- Specification
- Tools-Materials-Methods
- About Us
- Gallery

Mileage travelled:


Site News
Insulation, Ply lining, Flooring, Draughts
Insulating the van is one thing we would strongly recommend after spending a few days and nights in early summer with the van in an uninsulated state. In the sun the temperature inside was unbearably hot, at night absolutely freezing! The change in temperature went from one extreme to the other in minutes. When cooking in the van on a cold day one can see the uninsulated areas soon become wet with condensation, not good for the longevity of the van. Insulation also helps dampen out road and other noises.
Insulation materials
• Update, November 2014.
There are many different insulation materials - a visit to a large builders merchant is worthwhile to see what is available and suitable for a van conversion. Many self-builders used glass-fibre loft/wall roll insulation in the early days, but when fitted in a vertical position, unless the cut piece of material can be held firmly in place behind the ply lining, there is a chance it will slump down over time. There are much better versions of loft/wall roll insulation available now that don't have the health risk associated with glass-fibre. •
Many folks use rigid foam insulation boards obtainable from builders merchants. Others have had the whole interior spray foamed. Some professional converters are now using Thinsulate carpet-like material.
We chose rigid, 25mm thick Eco-Therm foil-faced, polyurethane foam core, roof insulation boards; simply because they seemed suitable, easy to work with, and the local Jewsons builders had them. Cost originally about £20 per 2400 x 1200mm board.
There are sources which can supply second-quality insulation boards at a much reduced price.
One disadvantage mentioned with insulation panels is they can squeak due to the movement of the van (this may only apply to the bare polystyrene-type panels which are less dense and do not have a card/foil facing). We took great care to fix our boards tightly against the van ribs, walls, etc, and have not noticed any obvious squeaks.
Insulating the floor
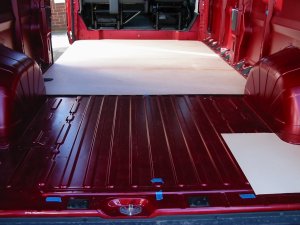
As most of the units and heavy items would rely on the floor as much as the walls for their main fixing, we took some trouble over this job. Also, in our first caravan, the floor sandwich construction became delaminated in the heavily-used areas and it felt spongy and horrible to walk on - we didn't want the same problem again. First, even though it was a pristine new van, the bare painted floor was washed with strong detergent solution to get rid of any grease/oil marks.
Three sheets of 3.5mm wbp ply were laid across ways using long blobs of Sikaflex adhesive to fix them to the metal corrugated floor. Cardboard templates were made to obtain the floor shape around the wheel arches and corners.

Next a grid of 25mm thick wood strips, spaced about 450mm apart, was glued down (using waterproof pva glue) and then infilled with pieces of insulation. A 6inch wide duct for pipes and cables was created to run across the floor near the centre using strips with no insulation infill. Finally, 12mm thick, genuine wbp ply boards were laid on top and fixed with brass woodscrews. So far, after seven years use, the floor seems satisfactory.
• Update. We should have applied at least one coat of varnish as soon as floor panels were laid. Due to a leak, the floor got wet during the build; varnish would stop water seepage and unsightly (but harmless) stains appearing through the ply surface from plies below. •

One of the floor duct entry points. We couldn't see a necessity for a duct running from front to back as cables, pipes, etc, will run in the cupboards, behind wall panels, or along the existing channels at head height behind the overhead lockers. We did in fact double the size of this duct opening after this photo was taken to make it easier to install water and gas pipes. It can't be seen, but there is a plastic channel divider within the duct to separate the gas pipes from cables and water pipes. Once all the pipes/cables are in we'll make a lid over the opening to keep foreign bodies entering the duct and possibly causing problems in the future.
Best not to stint on the width of this duct - it is surprising how many pipes and cables will end up being run through it! When making changes/additions, we always pull in a spare draw-wire each time to replace the existing wire - it's so much easier than trying to push things through the duct, especially when one is bent double on one's knees!
Insulating and lining the ceiling
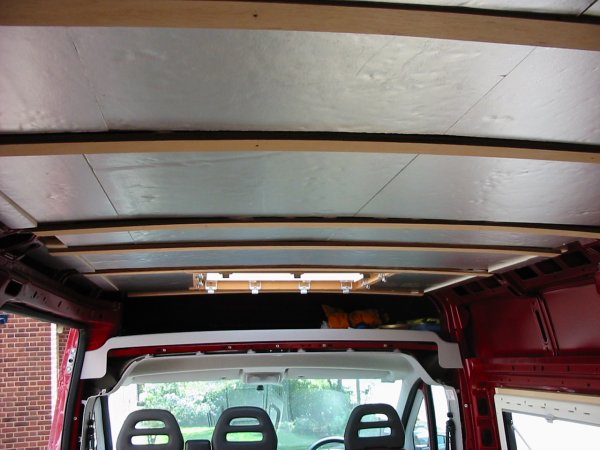
Due to the roof curvature, the ceiling insulation panels were made in separate pieces, it wasn't possible to fit one large piece as gluing it and holding it in place would have been too difficult; also these dense boards are very stiff, they do not bend - just crack and break. Smaller pieces (about 600mm square) were much easier to handle and once pushed in place the Sikaflex adhesive held them up without support.

To support the ceiling ply lining we used the van's existing roof support ribs that span across the roof and spaced about one metre apart and run from the cab to almost the rear doors. We fixed 12mm thick ply battens, 50mm wide, to the ribs using Sikaflex adhesive with a few screws to temporarily hold them in place while the adhesive set. The 5.5mm thick ceiling ply panels are then fixed to the ply battens with 12mm long stainless steel screws.
Note: we first tried a 3.5mm thick ply sheet, but found where the sheet was unsupported, along the van sides, it was wavy and not rigid enough - basically the 3.5mm ply was just too thin.
At ceiling height the van width is about 1.5m, this meant we couldn't use 2400x1200mm (8x4ft) ply sheets longways unless we had a join lengthways down the middle. We didn't like this idea as the ceiling curves slightly across and joins in the middle of curves never seem to be successful as flat spots are very difficult to avoid. So we had to use three sheets and join them acrossways at points where the battens occur.
In fact, we had to add more battens for these joins as the van roof ribs did not occur at the right place. It was worth the effort as the finished ceiling has a nice elegant curve whether looking from the front or back.
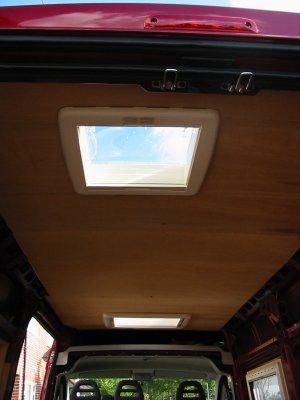
For the two main ceiling lights we fixed some Ega-tube oval plastic trunking in place, it runs from both sides with a break in the centre. Wires can be run from either side; it provides a convenient channel not only to make replacing or adding cables in the future an easier task, but to protect the pvc cable sheath against damage from being in contact with the insulation.
The position of the exit hole for the kitchen light wiring was estimated so the light did not cast a shadow - see Lighting section.
• Update.
As we have used plain plywood sheets, the ceiling was then covered in one continuous length of fairly thick vinyl material; we used a Solvite high-performance wall covering adhesive (see Tools/Materials section). One can purchase ply boards with a thin vinyl covering on one side, these are fairly inexpensive from places like Magnums (see Suppliers). If using these sheets, where the sheets join across the ceiling, some plastic strip will be needed to hide the joint.
We were surprised how much Deep Red can expand and contract in size. In normal weather a small bubble appears in the ceiling vinyl over the ply joint by the lounge circular light. In hot weather, say 30-40deg C. this bubble will completely disappear. It makes for a very good thermometer! •
Fitting the insulation was a very slow job, every piece had to be measured...
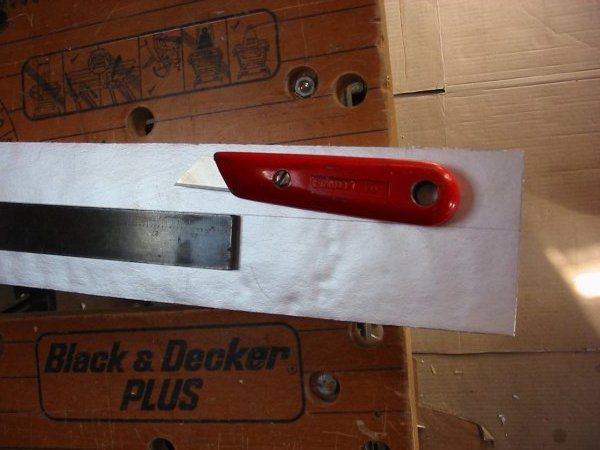
...cut to shape, and the edges bevelled slightly to fit tightly against the steel ribs. Initially, we used a hacksaw blade in a handle to cut the insulation, but this made a dreadful mess. A Stanley knife was the least messy method we found, but the blade was only just long enough for 25mm thick panels (a serrated bread knife may have been better).
Insulating the walls

Cutting and fixing the insulation panels is much the same task as the ceiling, but whereas the ceiling had only space for 25mm thick insulation, the walls mostly have a void of around 50mm behind the wall ply, so we have fitted two layers of insulation (first layer shown in the picture on left). Whether it will make that much difference in practice is impossible to measure precisely.
• Update. Adding the extra layers was definitely worth it. In the winter, with sub-zero temperatures outside, we found the van stayed warm overnight (14-16degC.) with the mains convector fire set at about 1.5kw. This is actually very good, as many Pro van conversions struggle to meet the Grade 2 standard; (Grade 2 being 20deg.C. inside when zero deg.C. outside), although recently several Pro conversions have now met the higher Grade 3 standard. •

All in all, insulating the walls was a rather tedious, but necessary, job. If we ever did it again I think we might be tempted to use a much easier to fit carpet-like Thinsulate material on the walls which take the most time.
Inside the steel rib sections that strengthen the corners and joins between ceiling and wall, it is not possible to fit small pieces of insulation board. In these areas we used a foil-faced insulation blanket-type material described below.
Vapour Barrier & Ventilation.
Much has been written on the SBMCC Forum about installing a vapour barrier between the van steel panels and the ply lining (some folks are near paranoid on this subject!). The idea being to stop condensation forming on the metal panel behind the insulation through steam or water vapour seeping past any joins in the wall lining and subsequently encouraging rust to form. Any flexible, waterproof sheet material should do (typically, good quality plastic sheet).
We covered any exposed steel sections with flexible insulation material after fitting the insulation board, we think it is enough, we've not seen any obvious damp when making changes or doing maintenance jobs. However, we don't live in the van in below freezing conditions for days on end which would probably make a difference.
We always have the small roof vent open at least one notch, even on cold nights and, as a result have yet to see any condensation form anywhere within the van, even on the inside of the windscreen - a notorious source (we use an external Silver Screen windscreen blanket). Good ventilation helps.
Insulating the overcab area and other awkward parts

For the doors, the overcab area (which is too curved for using the rigid insulation board) etc, we chose a flexible general purpose insulation material. This is like bubble wrap, but with foil on both sides. Where more than one piece is used it is recommended that adjoining pieces are overlapped by 75mm.
To be really effective this material should have an air space between it and the metalwork, but it is surprising, when installed, how effective this material is, especially on the doors with a ply lining.

The washroom wheel arch, another difficult object to insulate effectively.
There are other types of this flexible insulation blanket which have higher insulation properties, but these tend to be bulky and take up valuable storage space.
We don't use wool or fibre based insulation as the dust and loose fibres these products create is not good for our chest.
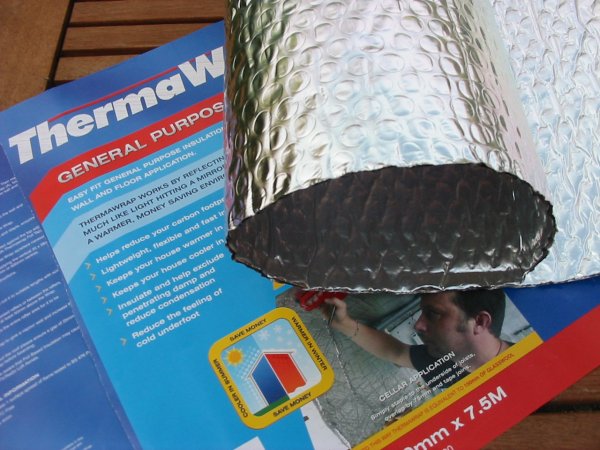
Supplied in a roll 600mm wide by 7.5 metres long and 4mm thick, it is easily cut with scissors. This is the ideal material for stuffing into those difficult shaped voids between the roof and walls, or in wall corner sections.

To fix the foil insulation wrap we used a high temperature contact adhesive. It was only necessary to apply three 25mm wide bands of adhesive to just the foil, then once the foil was positioned, it was sufficient to just lightly press it into place against the steel panel.
It is advisable to use a high-temperature glue when fixing direct to the van steel panels as the steel can become very hot in strong sunlight. The normal contact adhesives from diy shops are not suitable for use in high temperatures.
Do take care when using this type of glue - do most of the work out in the open for the fumes are very toxic.
• Update. Magnums sell a high-temperature, carpet aerosol spray adhesive, if only a small quantity is required. •
See Sources for suppliers.
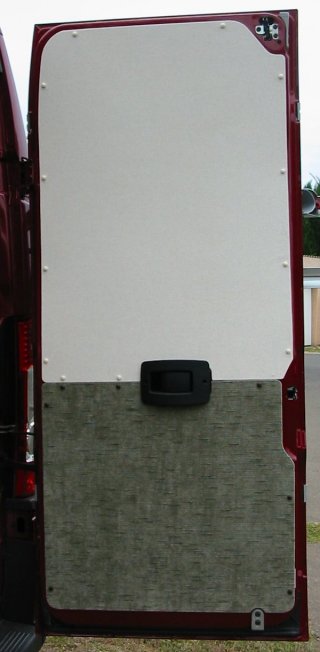
Insulating the Rear Doors

The rear doors are a fiddle to insulate. It is well worth doing however, as insulating and lining the doors makes a big difference to the interior and deadens the sound when shutting the doors.
The door lower half has internal webs that strengthen the door and house the lock mechanism - this makes it awkward to apply glue and position the insulation. There are also sharp projections to scratch one's hands.
The masking tape is applied temporarily to indicate the edge for the ply covering; the ply cannot fit to the very outside of the frame as it would then interfere with the door seal.
For the lining we used 3mm ply. The upper half is covered in the same acrylic-coated woven cotton material used for the walls; the lower half is the same covering material used on the bed/seat covers. We used a high-performance wall covering adhesive (see Tools/Materials section). Getting the cloth to fix to the ply can be tricky as the ply is very absorbent, so we applied two coats of adhesive to the ply, allowing the first coat to dry fully. The panels are fixed using stainless-steel, pan-head self-tapping screws, 12mm long, and covered with screw caps.
On some pro conversions they often have 'cubby holes' cut into the ply panels to give extra 'storage' - we didn't bother with these, we think they are more of a gimmick than of any real use - and the contents are likely to rattle on bumpy roads and fall out when going over road humps!


Ply lining the walls

Once the windows and wall insulation are installed, most folk then completely line the walls with ply panels, noting, of course, the locations of any battens that may be needed for subsequent fixings. We did not do it quite this way, but fitted the ply lining in sections later on. This system worked well with our 'modular' approach for making the various furniture units. For example, after we had made the kitchen unit we fitted the lining that went behind it. When the toilet compartment partition was made and offered into position we then sized the ply lining area and fitted it then. Our reason for doing it this way was we could leave the decisions on where to fix the wall battens for the ply lining or any other fixings once we knew what was going to be fitted in that position. It also meant we could easily remove any parts of the wall lining if we wanted to make changes or run extra pipes or cables in the future.
Ply lining around windows
There seem to be two main methods we are aware of to fix the ply lining around the Seitz window frame.
Method one uses four, 12mm thick, wide plywood strips to box-in the window frame. Each strip is fixed directly to the van steel panels along one edge with Sikaflex and butts up against the window frame. The wall ply-lining then sits on top of the strip to finish close up against the frame. The frame appears inset in the wall - very neat.

Method two (the one we used, it's all a matter of personal choice). This spaces similar ply strips away from the frame by fixing the strips on top of a separate piece of ply board, which is sandwiched between the Seitz frame and the wall battens underneath (the battens that were glued to the van metal work). The ply wall lining sits on top of the 'spaced-out' ply strips. The pics explain it, we hope!
Wall Coverings
Just a glance at the many pics on the SBMCC website of members vans will show there are numerous choices of materials one can use for covering the walls. If you have used ply, it can be: painted, vinyl wallpapered, stained, varnished, carpeted, plastic tiled - the list is endless.
For the kitchen wall we covered the ply in an acrylic-coated woven cotton, spongeable material bought off the roll 54inches wide. This was expensive material; a cheaper option would be pvc table-cloth material or thin vinyl - but we couldn't find the colour and pattern we wanted. Solvite high-performance wallcovering adhesive, sold ready-mixed in a tub, was used to attach the material to the ply - it worked well. The ply lining behind the lower kitchen unit was just varnished.
Floor Covering
It seems to us it really depends on ones lifestyle what to use for covering the ply floor. Whether to go for easily cleaned kitchen vinyl, or something similar, (often sold by the metre off the roll), or carpet. Vinyl tends to be hard underfoot and cold to the touch; carpet may be warm and soft to walk on in bare feet in the middle of the night, but will stain easily from mud, sand, and takes more effort to clean. Cheap vinyl will wear quickly in the heavily used areas by the doors losing its surface pattern revealing a plain backing. Similarly, cheap carpet will wear quickly.
Many Pro converters seem to use both: vinyl-type covering with carpet pieces with press-stud fixings on top in sitting areas.
Another decision to be made is: whether to cover the whole van floor before installing any furniture, or wait until all the seats and partitions are in, leaving the tricky task of cutting around all the shapes and obstacles - not an easy job with a big sheet of stiff vinyl.

We chose inexpensive carpet tiles (around £3.50 each from Homebase) and fitted them after all the seats and partitions were installed.
• Update, June 2013. We've just replaced all eleven tiles after four years hard use with a new set.

These tiles have a hard vinyl backing so liquid spills do not penetrate (we know having spilt coffee, tea, wine...). Tiles are easy to fit and if one takes care the joins between tiles are not noticeable.
The carpet is grey throughout but the flash photography adds pink hue!

If any tiles get really dirty they can be easily lifted and cleaned and hung up to dry! Buy a few spare tiles so any tiles that get badly stained can be simply replaced.
Cab carpet
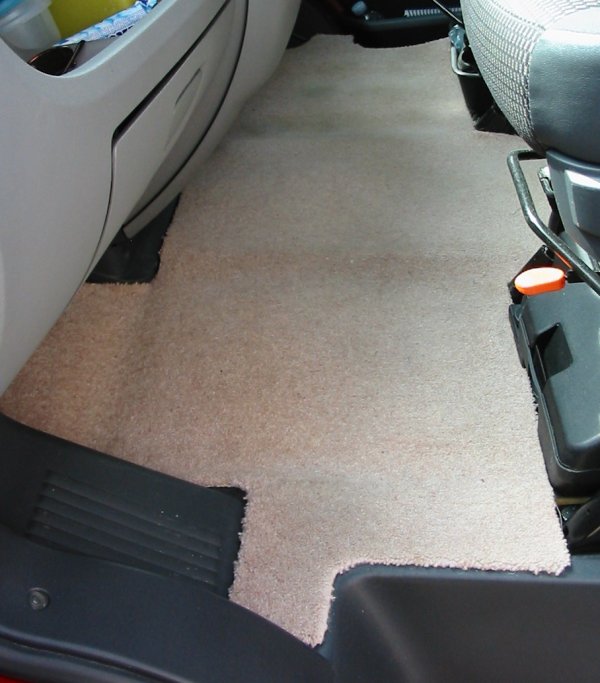
In the cab area we fitted a single piece of carpet (a leftover from our house). It took several hours to make an accurate paper cutting pattern so the carpet would fit snugly in place. Important to avoid loose carpet pieces that could get caught up with the accelerator or brake pedals. To stop fraying, the carpet edges will need binding.
One could, of course, save a lot of bother and buy a ready made cab carpet (we've seen them for around £25-30 at shows) but they were black material which tends to show all the bits dragged in off ones boots, so not very practical.
Dealing with Draughts
Even if one has made a thorough job of insulating the van, if motorhoming in the winter, or even late autumn or early spring, cold draughts of air around the legs and feet can really spoil one's enjoyment. It can be a challenge to track down the source of these draughts.
Here are some draughts we've found on our Ducato and what we've done to overcome them. We suspect these things apply to most vans.
1. Side sliding door. At the base of the door on the inside there is a big gap all the way along between the door and floor for the lower door runner. Cold air can find it's way in here. We use a small blanket and stuff it down the gap.
2. Dashboard. On the dashboard, close all the heater vents and turn the air control knob from fresh air to recirculate.
3. Rear doors. Some folks complain of draughts through gaps in the seal. Some Pro converters have gone as far as supplying a cover to fit over the centre join in the doors. We don't seem to have a problem with these (we checked with lit candle).
4. Air vents. At the rear, close to the bottom of the corner post just behind the wheel arch, is an air vent on both sides of the van on the inside (look for a black plastic moulding in the van wall at floor level). It's a one-way valve to allow air to escape out the van when closing the sliding door (have you noticed how much easier it is to close the sliding door if one leaves the passenger door, or a window, open?). This air vent/valve is only a piece of thin plastic which can leak and cause a draught. Of course, if it's covered with ply lining this won't apply.
5. Gas drop out holes. These are usually in cupboards and not normally a source of draughts, but we have one hole in the small seat/bed base that is exposed when the front panel of the base extends to make the bed. We are going to make a false front to cure this shortcoming.

6. The cab. It is difficult to be specific, there are so many holes through the van steel bulkhead between the interior and engine compartment, and under the seat bases. We've tried stuffing bits of flexible insulation in various openings, but we think it's waste of effort. If it's very cold outside, the best thing is to fix up a blanket to seal off the cab area completely.
7. Windows & rooflights. These shouldn't be a source of draughts, but, if it's very cold, some folks cover the inner window panels (these can get very cold) with pieces of stiff blanket-type insulation trapped between the blind and the window 'glass'. Some folks have curtains in their van; lining the curtains with a layer of curtain black-out material is very effective.
8. On the move. We don't find the Ducato cab heater very effective as, without a cab dividing bulkhead, it has to heat an area much larger than designed. We found that a blanket, stretched across at the back of the seats from shoulder level to floor and held in place with pegs, stops draughts around the legs and doesn't block the view out the side windows.