
- Home
- Making a start
- Design & Planning
- Windows & Rooflights
- Insulation & Flooring
- Furniture
- Beds & Seats
- Kitchen
- Washroom
- Electrics
- Gas
- Water
- Heating
- Lighting
- Security
- Accessories
- Sources & Suppliers
- Cost Guide
- Specification
- Tools-Materials-Methods
- About Us
- Gallery

Mileage travelled:


Site News
Security
One method of protecting the Catalytic Converter from theft.
In December 2010 we had the catalytic converter stolen. Like many other motorhome folks our van was parked in our front garden just a yard from the house. We only discovered the theft when leaving home to stay with a relative over Christmas. There was no indication on the dashboard that anything was wrong - only the engine exhaust sounded a little louder than normal. We could imagine some folks whose hearing is not so good might not notice anything wrong at all!
Fortunately (!) the cat had been unbolted at both ends, so no other damage was done. It was simply a matter of having the Fiat dealer fit a new cat for £800 (gulp!). This about as 'cheap' as it comes using Fiat parts; if the silencer/pipe and/or mainfold are also damaged the cost of repair could be much higher.
We took some preventive measures after this episode to try to prevent it happening again. We had also been looking for a suitable alarm system and recently, through the MMM magazine forum, heard of the Trucksecure product.
Trucksecure Catalytic Converter anti-theft system

Pic shows the basic kit of parts.
A GSM transmitter module can be added which will send a text message to your phone.
We are fitting this alarm and taking pics as we go to show what we did and any problems we may have had.
Clearly, we are not yet in a position to comment on the system or recommend it. However, if you are pulling your hair out trying to find an alarm, this may be the answer. It's not cheap: cost £159.50 plus vat and carriage. However, we look at it this way: it is the equivalent of £50 per year for four years - that is a pound a week insurance and peace of mind. See Sources for supplier details.

The thing we're trying to protect! The X250 Fiat/Peugeot/Citroen catalytic converter. Not a difficult thing to remove, unfortunately.

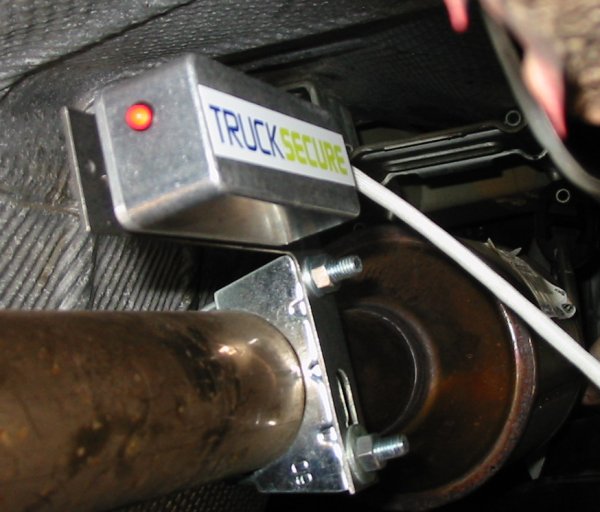
The detector has to be bolted to the exhaust pipe close to the Cat. It can't be seen in the pic but there is a small red LED fitted in the left-hand end of the aluminium case. This LED glows brightly when the alarm is set.

The exhaust pipe clamp is not supplied with the alarm kit. We got our clamp from the local Kwik-Fit exhaust repairer. Note, pipe is 60mm diameter.

The detector bolted in position. We used some large washers under the nuts as slots in detector mounting plate are quite wide. A 13mm spanner fits the 8mm clamp nuts.

The strobe light. Ideally, this needs to be fitted in the vicinity of the catalytic converter and where it can be easily seen. The light, along with warning label, hopefully send a message to any would-be thief that the Cat is alarmed and they would be better off going somewhere else! Once the alarm is set, the strobe flashes for about ten seconds every two minutes as an active deterrent. Should the alarm be activated the strobe will flash continuously for the alarm period of one minute; it will then reset to deterrent mode until activated again. Note the centre screw is fixed in position and drilled, the wires run up inside the screw.

An area of floor underneath the van close to the sill edge and near the Cat and a possible place to mount the strobe light. This flat panel is directly behind the handbrake lever, it is where the handbrake cable (arrowed) exits the cab.
The stobe light is fixed using a wing nut. This means one has to gain access to the other side of the panel. Alternatively, one could use black SikaFlex adhesive/sealant to glue the light in place, however removing the light unit in the future may be difficult without damaging it.

Inside the cab by handbrake - the plastic cover will have to be removed to gain access to the inside of steel floor.

Two screws and a moulded catch hold the cover in position. To release the catch a wide bladed screwdriver was used to lever the cover inwards after the screws were removed.

Down into the void! The inside of the steel floor panel. The black blob in the centre is a water drain plug similar to those used along the sills.

Back to the underside of floor, drain plug can be clearly seen. Bit of blue masking tape makes pencil marks easy to see. Two holes are drilled, one for strobe light, the other for a plastic grommet which will be the entry point for the detector cable.

Not quite enough room under van to use the drill, so ramps used to raise a few inches. No danger here as the holes to be drilled are close to edge of sill and it is not necessary to crawl under.

The wire tails on strobe light are very short. It would not be possible to connect them once the light is fitted in position in our case. We cut a 500mm length off one of the other cables supplied and soldered it to the tails and covered the joins with shrink wrap tubing. Not forgetting that the wing nut has to slip over these joins to fix the light! .

We used a spring washer under 5mm wing nut to prevent it coming loose in the future.

Strobe light in position just under the sill by driver's door. Cable from detector is well away from any hot parts and will get a fixing clip or two once the system is installed and tested.

114db sounder screwed to underside of van floor - it's tucked up in next bay towards the rear from strobe light. In this position it is shielded from the weather, but in open air to maximise the noise! Cable will enter directly above sounder making it difficult for thief to get access to cut cable. When the alarm is activated siren will sound for about one minute. Alarm then reset to 'armed' mode waiting any further attack.

'Emergency off' switch (rather blurred pic). This is wired in series with the 12volt positive supply wire feed to alarm controller. Switch in 'off' position will disable the alarm and stop the sounder if a fault has developed. One supposes this switch is usually hidden away from view in the vehicle.
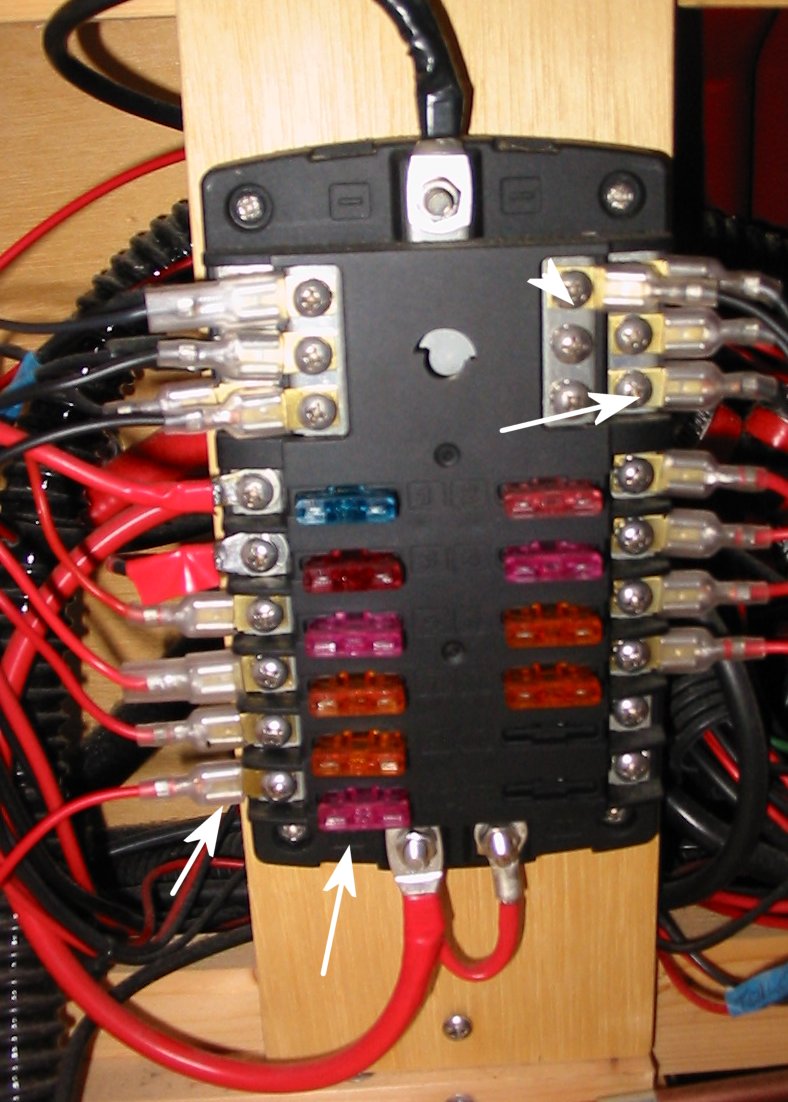
12 volt positive and negative feed to alarm controller is taken directly from leisure battery fuse panel. As this alarm was designed for commercial vehicles instructions suggest power is taken from van starter battery. As we have two 110amp hour leisure batteries which are likely to last much longer than our single van starter battery, we used that supply. We used 3amp fuse (arrowed) - alarm instructions do not state what size fuse should be used. Whilst multi-cored cable is supplied in kit, we preferred the more robust 1.0mm2 14/0.3 stranded cable.
The alarm is designed to go into the 'armed' state when the van ignition is turned off. Thus any time the van is not being driven, the alarm is automatically turned on. This requires a 12volt fused supply from the van ignition switch - the instructions suggest this can be taken from the 'bodybuilders plug' on most vehicles. We could not find information on this in the Fiat owner's handbook, so, for the moment, we have not fitted this IGN supply wire. It means that we shall have to use the 'emergency off' switch any time the engine is running and van is being driven. That's fine, we can live with that. We shall have to remember to turn it on though!

The controller and wiring diagram. Four screws secure the controller case lid. These are removed from the back of the base plate. Once the controller base is fixed in place the lid cannot be removed or fitted. One has the choice whether to wire the unit while loose, resting it on a flat surface; or temporarily fit the unit, wire it up, then remove the base fixing to fit the lid. One supposes once wired up and fixed in place they'll be no need to remove the cover - not so - see below!

The alarm may be wired for either a 12 or 24 volt supply. If using 12volts then the jumper plug has to be fitted over the two jumper pins on the pcb. Wiring diagram shows the position. Red arrow shows the tiny jumper plug; white arrow shows pins on pcb. This is best done in good light before starting to wire the controller as pins are very small and quite delicate.

The controller wired up and ready to be fixed in position in the sofa bed base. In this pic it is powered up. Note the bright red 'ok' LED at bottom of unit is lit. This LED is lit all the time the alarm is powered, unless the alarm is activated when it will go off for a few seconds. When the power is first switched on the 'delay' LED will also light for about 120 seconds. Once this LED has gone off the system is armed. Should the alarm be activated the 'alert' LED will light for about one minute.

Clearly, once the controller case lid is fitted (and it should not be left off as it provides physical protection to the delicate electronic components) it is not possible to see if the unit is 'armed', or even 'live' for that matter. The only way to tell then is by looking at the red LED on the detector fixed to the catalytic converter (or giving it a tap on the end and upsetting the neighbours!).
Quality Assurance Issue. On our system the cables were supplied with different colour-coded conductors from those shown on the wiring diagram and instruction sheet. The pre-wired strobe 2-wire cable was wired with red and green conductors. The pre-wired 4-wire detector cable had green, red, yellow and blue conductors - the wiring diagram and instructions show black wires - not green. This is a serious Quality Assurance failure.
The detector in 'armed' state showing red LED lit. Testing is by giving two light taps on the end of the detector case - alarm will activate! Pic slopes as camera was held at awkward angle, detector bracket is actually fixed in vertical position.

Warning label fixed close to catalytic converter; strobe light is just below label and shows up very brightly at night.
We have a few questions about this product and some comments to make to the supplier. Well get round to those shortly. However, as far as we can tell to date, the alarm does work as claimed. It is not too difficult to install diy. Whether it will scare off any potential thieves remains to be seen.