
- Home
- Making a start
- Design & Planning
- Windows & Rooflights
- Insulation & Flooring
- Furniture
- Beds & Seats
- Kitchen
- Washroom
- Electrics
- Gas
- Water
- Heating
- Lighting
- Security
- Accessories
- Sources & Suppliers
- Cost Guide
- Specification
- Tools-Materials-Methods
- About Us
- Gallery

Mileage travelled:


Site News
Design & Planning
Choosing an Interior Layout

We looked at many professional van conversions.
The popular layout designs seemed to be:
- the fixed bed or sofa(s)/bed at the rear with washroom down one side and kitchen along the other
- the sofa/bed at the front (the so-called 'front lounge' layout), with washroom on one side and kitchen along the other
- the washroom across the back (and possibly incorporating a wardrobe), with sofa/bed at front on one side and kitchen on the other
There are many variations on these basic layouts depending on whether it's intended for two people or a family (in which case there is often a small dinette with belted travel seats at the front).
Some of the shorter wheelbase vans also use swivel cab seats, not only to provide a lounge/diner area, but use the swivelled seat as part of a single bed mattress.
We believe time spent looking at the many designs used by professional converters was very worthwhile. If one is uncertain which layout is best for you, do go to a big motorhome show where there will be many campers and motorhomes to crawl under.
Try the beds out (and make sure they are a good 4 inches longer than you are!), stand at the kitchen unit and imagine cooking a meal and doing the washing-up and where to put the soapy plates down, stand in the washroom and try turning around without banging your head or arm on something. Finally, ask yourself where are you going to store all the accessories: the outdoor lounger chairs you've fell in love with on the Lafuma stand, the windscreen blanket, the groundsheet, the windbreak, the wheel wedges, and so on!
The first layout we considered - with 3-way gas fridge
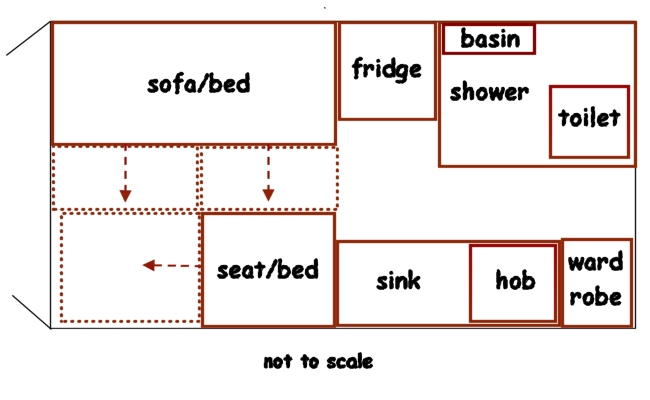
Originally, we were going to use this layout. As we wanted to be self-sufficient, even for only one night (to be able to use French Aires), we would need our own toilet facilities and a practical kitchen. The kitchen is on the nearside as Mad Mumsie wanted to be able to see out the window into an attached awning where the grandchildren may be.
The sofa and seat/bed can be used as two single beds longways, leaving a corridor in the middle, handy at night if you need the toilet without disturbing one's partner. It also allows easy access to the cab area.
When extended sideways, the sofa and seat can be either: a 6-foot square double bed, or, by extending only one sofa front, a U-shaped-bed.
The main disadvantage with extended beds is they have to be made up each night, but that doesn't bother us. With swivelling cab seats this layout makes a great lounge area for a modest crowd.
A variation to this layout is to extend the washroom across the rear of the 'corridor', in front of the rear doors; it just gives that extra square metre of very useful washroom/shower floor space. This doesn't have to mean the rear doors are unuseable, one can still exit and enter through them, providing one doesn't build a full-blown fixed partition in front of the doors. Careful positioning of the toilet and the shower will be needed and, perhaps, a curtain across the doors in case anyone forgets their partner is showering, or using the toilet, when trying to enter from outside!
Gas Fridge - the vents position
The gas fridge is shown on the offside to allow the combustion gases to be released through its vents. We did look at fitting the gas fridge on the near side, next to the sink/hob, which would have been moved towards the rear to make the space. However, the fridge vents would then be masked by the sliding side door when opened, but worse still, if we fitted a full awning on the door side, the fridge combustion gases would have nowhere to go. The fridge is positioned in the centre as the rear wheel arch is large and trying to fit a fridge over the arch would have reduced the fridge volume.
When we came to work out the gas fridge installation, it was apparent that the position of the internal steel strengthening rib that runs along the van on both sides at about waist height, was going to create a few problems. The fridge would have to be fixed so it cleared this rib (to allow the hot gasses from the fridge burner below to escape out the upper vent), and making an effective seal around the fridge cabinet and wall join would be challenging because of the van body/rib shape.
Our first layout - with 12volt compressor fridge

Fortunately we had not bought the fridge in advance, so considered whether a 12 volt compressor fridge would be better. These do not require external vents so are much easier to install. This meant we could now put the fridge under the worktop on the same side as the sink. It also meant the wardrobe could be repositioned alongside the shower/toilet compartment thus keeping all the tall structures on one side giving the interior a lighter, airy feel. In all, this was a much better layout, so we chose this. After 6 years use we're glad to say it proved ideal and worked well.
Worth a mention is the door hinging. The washroom door opens so that it gives extra space in the 'corridor' for dressing, whilst also blocking the view through the van from the windscreen.
The wardrobe door has to hang with its hinges on the right. If it was hung on the left side, it would be possible to open the door, but not easily gain access to interior - as the open door tends to block entry (unless the wardrobe door is very narrow in width) - the only way to get at the wardrobe contents in this situation is to exit the van and come back in through the rear doors!
12volt Compressor Fridge - considerations
A disadvantage with the compressor fridge is the need for large capacity batteries and somewhere to safely store them and, if wild camping, or at a campsite with no mains supply, some means to keep these batteries charged. With the advent of solar power panels being able to produce a useable output, it seems to us the advantages of the electric fridge over the 3-way gas/electric type are overwhelming. See the Electrical section for more info.
Our new 2014 layout

After six years use we realised some changes to the washroom and wardrobe would make our life a little easier.
As we are not getting any younger, the Thetford toilet cassette was becoming a struggle to carry any distance. We found a new Dometic swivel-bowl toilet was available that had wheels and pull-out handle incorporated into a bigger capacity cassette, but it requires some drastic redesign of the washroom and wardrobe to fit.

Also, having bought two Lafuma high-back chairs to replace our old garden chairs (more luxury, will it never end...), plus a wind-break and other accessories, meant the original wardrobe/store cupboard, pictured left, was now too narrow, so we shall have to increase the width; this will also make it easier to store hanging clothes. The washroom will lose a good 75mm off its length; this may not seem much, but, in a van conversion, it is a significant amount.
The folding table, which used to go inside the cupboard and was a nightmare to put away, will now be stored against the rear panel.
• Update. In fact, the table will now go easily into the new wardrobe when travelling, but during the day and overnight we tuck it away against the rear partition at the very back. •
The existing washroom/wardrobe long side, and the intermediate partition between the wardrobe and washroom, will have to be scrapped and new ones made. These changes will keep us busy through the winter. Further details in the Washroom section.
Practical Considerations
Obtain Dimensions & Product Information
Once we had the van and decided on the layout, it was necessary to get the dimensions of any appliances we were not buying straight away - this to be sure it would all fit. Suppliers and manufacturers catalogues and websites provided the information. Some items, like heaters with flues, have limits on where the flue can be located, so that can affect the layout. It is also useful to know what the power (watts) requirements are so the leisure battery (if bought early on) would have sufficient capacity.
Make a mock-up
After we had decided on a layout and drawn a rough plan, we got some old cardboard boxes and roll of masking tape and made a mock-up in the back of the van of where the main items of furniture and partitions would be - not forgetting things like doors have to open fully.
Weight distribution
When planning the location of heavy items like the fridge, water heater, batteries, water tanks, oven, gas bottles and so forth, it was important to note the weights of these items and place them so the van did not end up lop-sided through too much weight being placed on one side.
Maintenance
We tried to plan where electric cables, gas and water pipe runs would be needed, and for additions/changes in the future. Whilst the cable/pipe ducts we built-in under the floor were large enough, we didn't make the entry into the ducts big enough to the install the copper pipes easily, so had to increase these openings. Similarly, we planned where any joints/connections would be required - bearing in mind also that at sometime in the future one may need to access these pipes, joints and wires. Important too not to forget the van's own items: the rear light clusters, for example - these will have to be accessed at some time to change a bulb, so things like the kitchen end panel may have to be removeable for access.
Planning an order of work
It does seem daunting - where does one start? Working out what needs to be done, and the order of doing it is, we believe, one of the hardest parts of doing a van conversion. There are no rules for a start, one can do the conversion in any order one wishes.
However, most self-builders would agree there are some jobs best done early on that may save time and/or expense later. Typically, the rooflights and windows are usually the first items fitted. If one doesn't then it is soon evident that it's difficult to complete other work.

Also cutting large holes with a powered jigsaw generates lots of tiny metal shreds...
These shreds get blown all over the interior and if not cleared up will rust leaving unsightly marks over all your lovely work. Better to do this work when the van is empty.
The floor, ceiling and wall battens, insulation and ply lining are usually next, followed by partitions and furniture units. If one has decided to run pipes and cables behind panelling or underfloor, then ducts and conduits will have to be installed early. If anything heavy has to be fixed under the van, like water tanks or a gas tank, it is a little easier to arrange good fixings before the ply floor is laid.
If one is keen to use the van early on, but working to a tight budget, it may be possible to delay the purchase and installation of some expensive items yet still have a useable van - careful planning and a little ingenuity should make this possible.
There are a lot of things to think about and decisions to be made at the start (it can seem like the chicken and egg syndrome), but if one breaks it down into separate jobs, all should be well. We found it easier to work things out while sitting in the van with pencil, notebook and ruler. Surrounded by cardboard boxes for a sofa, another box as a kitchen unit and carboard partitions, we were able to visualize what needed to be done, and when, and work out where items like the battery, water tanks, gas tank and pipes and cables, were best located. We stuck bits of blue tape everywhere on the walls and floor marking out the positions of items.
Our Order of Work
In the table below is the order we installed the various items (as much as we remember!). It's provided simply as a guide as every conversion would be different.
| Item | Comments |
|---|---|
| Timber floor grid, duct, and floor insulation | Full details on each activity are in the relevant pages |
| Floor ply | The ply floor was laid and insulated first as using steps (to reach ceiling) on the uneven steel corrugated van floor was a pain; a metal floor is cold in winter and horrible to walk on too! |
| Windows - Lounge | Before finally fixing each inner window frame, a ply surround covered in wall fabric was made and fitted |
| Rooflights | The inner half of a rooflight finally fitted after ceiling is insulated, ply lined and vinyl covered |
| Cable conduits - ceiling lights | 'Draw-wires' were inserted in all conduits and ducts for installing the cables. New draw-wires were added as cables are installed - useful for any later additions |
| Ceiling insulation | |
| Ceiling Ply | |
| Ceiling vinyl covering | |
| Wall Insulation | This was a very slow, tedious job. We did it in sections, taking a break and going off to make various furniture items in between. |
| Sofa/bed base with wall ply section | We did not fully ply line the whole interior in one go, as many do, but installed ply wall in sections as each furniture item was fitted |
| Kitchen Sliding Window | There was a 14 week delay on delivery of this sliding window, it would have been easier to fit this at same time as lounge windows |
| Conduits & metal back box on kitchen wall side for mains sockets & conduits and gas pipes for gas hob & oven | |
| Kitchen cabinet, kitchen wall ply and worktop | |
| Single seat base | |
| Seat/bed foams ordered | |
| Washroom and wardrobe partitions | |
| Washroom window & ply lining | In fact the toilet window was fitted somewhat later. We were undecided (read that as prevaricated!) where to locate the washbasin and window for a long time. However, in the build order this would be a good point to install the window. |
| Thetford Toilet | We fitted the 'facilities' in early on - saves a lot of running back to the house to use the toilet upstairs! |
| Battery Box built & fitted in sofa base; hole drilled through box and van floor for vent tubes | |
| Conduits for mains and 12 volt cables installed in sofa base and van vertical wall ribs in area by wood control panel | |
| Sterling B2B unit and cables to Batteries | |
| 240 volt mains input socket in van offside wall | |
| 240 volt 'Garage' mains unit and cabling for socket outlets and water heater | |
| Veneered ply wall control panel made and fixed | |
| Main Fuse box & Master switch & in-line fuse holders & cables to leisure battery | |
| Ceiling light cables | |
| Ceiling lights | |
| Sterling remote diagnostic panel & switches for lights, water pump, water heater; water tank gauges; 240v mains socket - all fitted on control panel | |
| 12volt wiring from fuse box for water pump, gas hob, oven & fridge installed underfloor | |
| Sink unit with tap fixed in worktop | |
| Water heater & flue installed in van offside wall; 12volt wiring to control panel | |
| Water pipes - heater to sink tap run in underfloor duct | |
| Fresh Water & Waste Tanks fitted under van; sender 12v cables to gauges on control panel | |
| Fresh water Filler point installed in van wall on nearside; filler pipe to tank | |
| Waste water pipes; sink to tank, & drain tap | |
| Water pump | |
| Water pipes - pump to tank and sink tap | |
| Gas Tank underfloor | |
| Gas Filler in nearside van wall | |
| Gas manifold in seat/bed | |
| Gas pipes from manifold to water heater installed in duct | |
| Gas Hob & Oven fitted | |
| Gas drop-out holes drilled through van floor in kitchen base, small seat base and sofa base | At this point all the underfloor tanks were in place so locations of drop-out holes could be decided. |
| Fridge fitted | |
| Washroom temporary basin/taps; basin water pipes teed into existing cold/hot pipes | |
| Carpet installed | |
| Overhead Lockers built & installed | |
| Gas/Electric Warm-air heater fitted in seat/bed | |
| Fiamma Awning | |
| Fiamma 2-bike rack | |
| Seat/bed covers ordered and fitted | See note below |
Having done all the work on Deep Red ourselves, we intended to make the seat covers too. We had already bought the covering material and had covered the foams with dacron in readiness. However, not having a good sewing machine, and Mad Mumsie having arthritis in her hands, we decided this was a job for a professional. The look of the seat covers makes a huge difference to the final appearance of the van interior. The cost is not that great when factored into the overall cost. We think it was one of our better decisions.
There is no shame in employing a pro to do any of the work on one's van; few of us has the knowledge, ability, or facilities to do all the jobs on a van conversion. Above all, do keep safe.
See Gallery section for pics showing the current state of Deep Red.
Some other thoughts - Colours. Proportions. The Golden Mean.
It is very easy to get carried away once you have got the van and decided upon a layout to then get stuck-in sawing up bits of wood, buying items, and so forth. However, we think it is worthwhile giving some thought to what the interior is going to look and feel like once it's done.
What is it going to be like to live in? Will it be light and airy? Will it be dark and subdued? Have you thought of giving it a theme using particular materials, textures and colours? (We wanted Deep Red to be like an Orient Express railway carriage inside!)
If one saves on installing a window or rooflight, what effect will that have? Will the van need more interior lights for dark days? Will you need a bigger battery?
Will the whopping great fridge you've seen cheap on Ebay totally overwhelm the interior?
Try sketching and changing the size and shape of cupboard/lockers - getting the proportions just right adds a great deal to the aesthetics. The ideal proportions of the Golden Mean are 1:1.61. (See Wiki for more info on this fascinating subject!). In our opinion, if the proportions of the furniture etc. are more or less right, then it makes a big difference to feel of the interior of the van.
We suspect many self-builders see something they like in a particular van and then set about creating their own version of it. This seems a good plan. Some layouts are classics and one won't go far wrong copying them - as long as the design will fit in your van and suits your lifestyle.

If one hasn't given much thought to the colours, or unsure of the effect, it is worth consulting a colour wheel as this will indicate if the colours go well together.
Of course, some folks are pure individuals and do their own thing right from start to finish and it all comes out being a superb van. We hate them.