Site News
Water System
Schematic of Water System
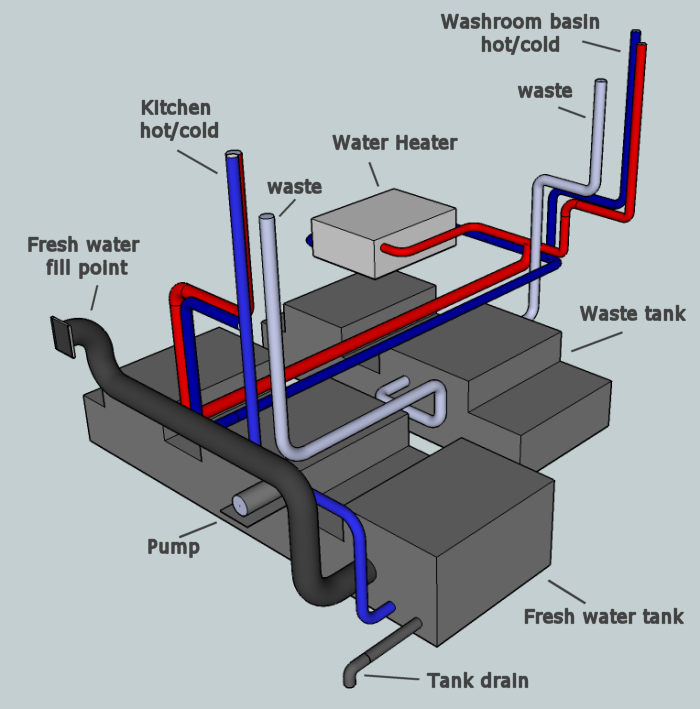
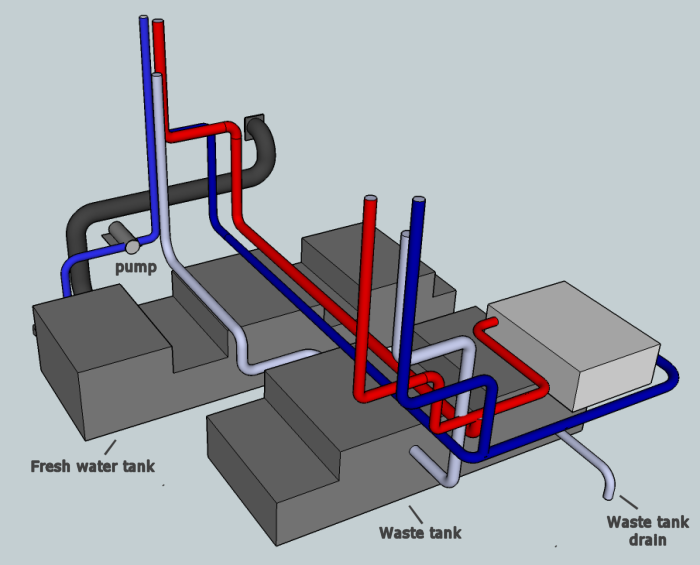
Our basic layout. Drawing on left as viewed from van nearside, on right from off-side. The washroom basin taps were intended to double up as the shower head, but this is about to change.
Water Tanks Location.
If one has space there are advantages in fitting the fresh water tank inside the van. In very cold weather if the van is in use and some space heating is on, then the water in the tank is unlikely to freeze. The water will not be quite so cold and take less time to heat up - saving on gas if no electric available. It may also be possible to run all the pipes inside the van saving holes through the floor. Beware though, once an insulated van becomes very cold inside, it tends to stay that way and it is very likely any water inside will still freeze! We chose to put the fresh and waste water tanks under the floor simply to save space.
Installation
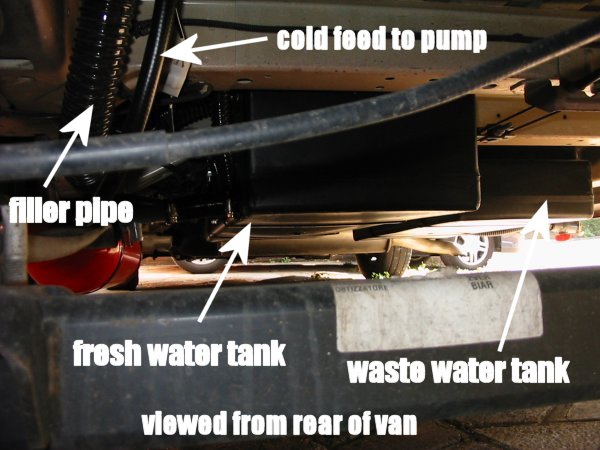
One advantage of using a van popular with professional van converters is that some items are readily available and bolt straight on without too much work.
This was almost the case with the fresh and waste water tanks we got from CAK Tanks. These tanks were shaped to fit and already had the inlet and outlet pipe stubs fitted (one can specify where you want the stubs fitted and if you want inspection caps).
The fresh water tank holds 66 litres; the waste tank 50 litres.

The standard fixing brackets were supplied with long hook bolts, but try as we may we could not arrange these bolts to hang from a chassis member and line up with the holes in the brackets at the positions we thought they should be placed. We obtained some 8mm threaded rod and made long studs which go through the van floor and secured to the brackets with two nuts as shown in the photo. The brackets were supplied unpainted so we gave them two coats of black smooth Hammerite paint.

The studs are secured on the inside with large penny washers and two lock-nutted 8mm nuts (shades of Meccano!).

The fresh water tank is filled from a lockable filler positioned in the nearside wall close to the back of the sliding door. This position was originally chosen for a fresh tank fitted inside the seat box. Having changed to a compressor fridge on the kitchen side meant the existing fresh water filler connection and its 50mm dia (40mm bore) pipe would be tight up against the back of the fridge. Although there is a 70mm gap here it wasn't quite enough, so we had to cut a little bit off the plastic filler stub so the flexible ribbed pipe could bend at a right angle, a good quality Jubilee clip holds it in place satisfactorily (a pic here once we move the fridge out...).
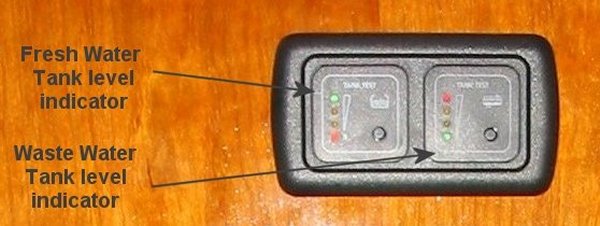
To determine how much water is in the tanks, each one has a sender unit fitted in the top; these send a signal to light up LED gauges mounted on the control panel when a button is pressed. This model sender and gauge from CAK can be diy fitted (we did the waste tank); it requires a 50mm hole cut in the tank top, the two stainless steel rods that act as probes have to be cut to length (depending on the tank depth), but this is easily done with a hacksaw. If you order a tank and sender together, CAK will fit it for you at no charge. The gauges fit neatly into CBE plastic plates.

Side view of waste water tank. Note, both fresh and waste water tanks have castlelated shape so they fit around chassis members and up close to underside of van floor making good use of the space. In fact, when clamped up tight by fixing brackets, the tank is tight against the chassis member but a small gap exists between tank top and van floor - this gives clearance for the water level sender unit fitted in the tank top which protrudes from the top of the tank slightly.
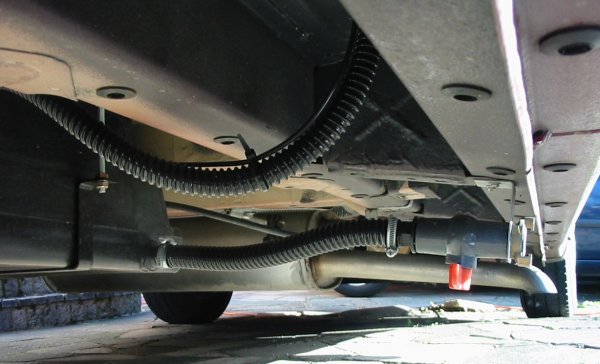
The waste tank drain pipe and red ball valve tap (see below) fixed to sill with steel bracket. This pipe can be extended, if necessary, by using the pipe and bayonet fitting described in 'Accessories' page. A full waste tank takes but a few minutes to empty. Note to connect the tank drain pipe to the drain valve requires a threaded hose adaptor and worm-drive clip.
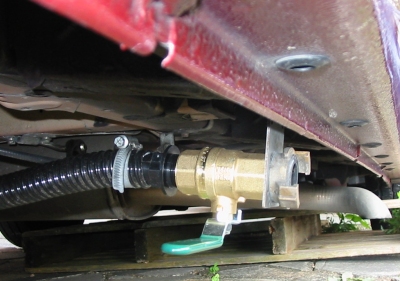
The red plastic ball drain valve we bought from CAK Tanks only survived for a couple of years before the tap ears broke off! This valve was always awkward and stiff to use so we looked for a better alternative. The new drain valve from ASAP Supplies (see Sources) is brass with a nice long single lever that operates quarter turn on/off. The valve body is tapped 3/4 inch BSP both ends and is a direct replacement. Note, as the bayonet fitting for the extension hose is also brass and screws into the brass drain valve body (and also serves to clamp the fittings together on the steel support bracket), we used some Copperslip grease on the threads to prevent the brass parts from seizing together.

Water Pump and pipes
The water pump is fitted in the base of the kitchen unit - there wasn't a lot of choice where to put it; it either went here or in one of the bed lockers. In this position it can be readily accessed for maintenance/cleaning of the filter and, luckily, the cold water pipe runs are kept as short as possible.

The 50mm dia water filler pipe to fresh water tank had to run along the back of the fridge, into the kitchen cabinet, into the wheel arch box, out of the wheel arch box, and then down through the floor to bend at a right angle to connect with the tank pipe stub! Not the ideal pipe run, but having cut a hole in the van wall panel for the filler to suit the old tank position, we couldn't bring ourselves to not use it.

Large water filler hose exits the floor and bends round to fit on tank stub (it's unseen, but there's a Jubilee worm-drive clip on the hose there also). The smaller diameter smooth pipe is the 12mm feed pipe going from the stub at the base of the tank up through the floor to the pump inlet connection.
The fresh water tank drain pipe and its grey tap can be seen in the foreground. This tap has become very stiff over time and we are looking to replace it with a brass version with longer handle to make it easier to use.

There are several types of pipe and fittings that can be used: such as the JG push-fit fittings and semi-rigid pipe (see also Heating section). We used the flexible pipes sold by CAK Tanks and simple plastic tee joints with 'Jubilee' worm-drive clips. These were easy to install and needed little support as most pipes ran in the floor duct. We chose this pipe as we were familiar with it from our caravanning days.
The pic shows the pipes behind the sofa bed. The cold feed pipe (black) is coming up from the pump going to the water heater with a tee going off to the washroom basin tap. The red pipe is the hot water supply from the heater to the kitchen sink with the tee going off to washroom basin hot tap.

Inside the kitchen unit showing the black cold feed pipe from the pump going up to the kitchen sink tap with a tee going off and down into the floor duct to run across to the water heater. The red pipe is the hot supply from the water heater going up to the sink tap.

Here the pipe connections to the kitchen sink taps. Take care not to build in too many shelves etc that may make access for maintenance in the future a headache!
See Heating Section for pipe connections to water heater.
Washroom Basin and Taps
See Washroom Section as this is undergoing a makeover!


