
- Home
- Making a start
- Design & Planning
- Windows & Rooflights
- Insulation & Flooring
- Furniture
- Beds & Seats
- Kitchen
- Washroom
- Electrics
- Gas
- Water
- Heating
- Lighting
- Security
- Accessories
- Sources & Suppliers
- Cost Guide
- Specification
- Tools-Materials-Methods
- About Us
- Gallery

Mileage travelled:


Site News
Gas Installation.
Refillable tank.
Having considered the options (see below) we decided to install a '4-hole' 20-litre refillable LPG gas tank under the van floor. This saves using valuable space inside the van for a gas bottle locker.
A refillable tank can be topped up at any time, it does not have to be empty. Fitting a refillable tank makes life much easier; no worrying about changing empty bottles. It has proved a good choice (noticeably a good many Pro converters are now fitting them).
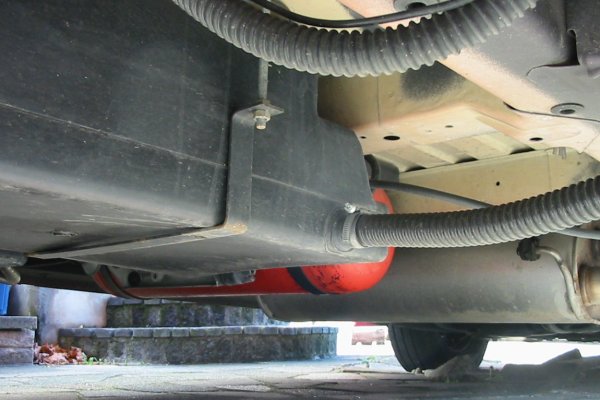
Our tank fitted neatly between the exhaust silencer and the handbrake mechanism.

The 'Stako' gas tank is suspended using two plastic-covered steel straps which fix to a simple steel frame which in turn is bolted securely to the van floor.
Update October 2013 • The two straps supplied with the Stako tank are not really adequate when the tank is suspended in this manner. The straps are also prone to rusting inside the plastic sheathing. For safety, it is recommended that a third, and more substantial strap with fixing clamp, be added (see Tinley Tech in Suppliers for details). One supplier (Autogas, I believe) can supply more robust stainless steel straps to replace the Stako frame/straps. (Note, a number of Pro converters have fitted these tanks in the past using the Stako frame/straps) •
The tank is supplied with an on-off valve, a gas level gauge, an automatic shut-off valve - which operates when 80 percent full - and the inlet and outlet pipe fittings, all of which are already fitted.
A 30mbar regulator (as used on gas bottles) is connected to the on-off output valve (note the regulator large fixing nut has a left-hand thread). 8mm pipe is run from the regulator outlet to a four-way outlet manifold fitted in the small seat box.

As can be seen in this rear view the tank is safely tucked up out of harms way. This is a position often chosen by many Pro Converters, although some who install larger tanks fit them at the spare wheel position (we don't know what they do with the spare wheel in this case). It is a grovel under the van to turn the gas valve on or off, or check the level indicator (we keep a piece of polythene for laying on). Gas level gauges are available for fitting remotely from the tank, but we haven't bothered with this - just more things to go wrong!

In the early days we had the tank fitted to the chassis under the sill on the nearside. In this position it was easy to turn the tank valve on or off, and it was also possible to see the level gauge, even when refilling at the LPG pump. Although the tank was higher off the road than the diesel tank or the rear axle, we felt it was vunerable to road humps in this position.

The tank filler point is fitted on the van nearside wall at about waist height and close to the tank position underneath. An 8mm pipe connects the tank and filler. The brass filler body has a female thread and a bayonet fitting; in the UK the bayonet marries with the garage pump filler gun.
Capacity
Although the refillable tank has a capacity of 20 litres of LPG, it actually only holds 80 percent, or 16 litres of liquid gas when full. This is to allow space for gas vapour at the top of the tank (it is the gas vapour that flows in the outlet pipes and is burnt). As one litre of LPG weighs about 0.55kg, this means a 20 litre tank is approximately equal to a 9kg gas bottle (16x0.55 = 8.8kg).
Gas distribution

The outlet pipe from the tank passes through the van floor and terminates at a 4-way manifold fixed to the floor in the small seat box. Each appliance in the van has its own length of piping and manifold tap allowing the gas supply to be isolated.
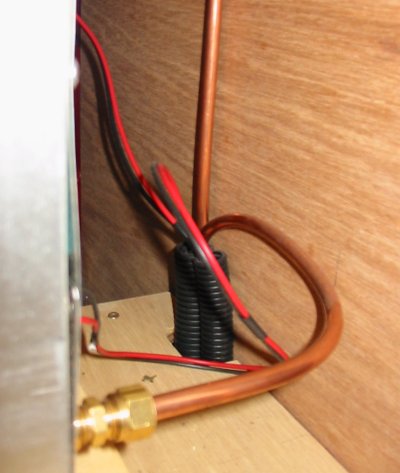
Apart from the manifold connection, there are no joints in the piping. All pipes are run in protective conduit and fixed with clips where required. Pic shows oven connection and pipe up to gas hob.
Sticker on outside near tank position indicating gas on-board.
Update - Our Gas Consumption
After many trips we've been able to measure our average gas consumption. In the summer (using no space heating) it is 2 litres per week, or 10 per cent of the tank capacity per week. Therefore, if our tank was filled (80%) on leaving home, it would last us up to 8 weeks.
Typically, we use gas in the morning to heat the hob (for milk) and the grill for about 15 minutes (for toast); we occasionally cook on the hob at lunchtime for soups etc; most evenings we have a main meal - which usually uses the oven and several burners on the hob (both for about 30 - 45 minutes).
We also use gas to heat water - usually about 25 minutes each morning and evening (this in combination with the water heater's electric element when on hook-up).
In the late spring and autumn, the gas space heater is only used first thing in the morning for half hour to raise the internal temperature and in the evening for an hour or so. We haven't accurately measured this extra usage to date.
Whilst we have camped in winter when temperatures outside were below zero, we have used mains supply and an electric convector fire for heating. We have yet to run solely on gas heating in these conditions. However, it is possible to work out the likely additional gas usage when using the space heater.
From the manufacturers quoted figures the average gas consumption of the HS2000E heater is 142 grams/hour; or 31.7 hours from a 4.5kg tank. As our tank is approximately 9kg capacity, the heater could be run for about 63 hours non-stop. Very roughly, using the gas only for cooking and heating we estimate our tank would last between 1-2 weeks - this, of course, depending on how many hours one used the heater in the day/evening. Those folk who like to camp regularly at temperatures below freezing (not us!) would probably find the 20 litre tank too small.
Filling the Tank

We have included this part for anyone considering installing a refillable tank and who may be a little nervous of the filling operation - I know we were!
Filling the tank is a straightforward procedure, all the pumps we have used have had clear operating instructions. It is advisable to wear work gloves to protect hands.

Once at a garage selling LPG, the first challenge is to find the location of the LPG pump as it is often sited in the same line as normal petrol/diesel pumps and looks much the same from a distance - In the UK the pump will be marked 'AutoGas'.
We find it best to park the van near the garage entrance and go walkabout to locate the pump so that we arrive with our nearside filler point on the same side, and close to, the garage pump - this is essential as one has to stand at the pump when filling.
Assuming the pump hose has a bayonet gun fitting, the gun shroud is lined up with the pins on the filler point, the gun pushed on, then the shroud turned quarter of a turn clockwise to lock the gun in postion. The gun trigger is now operated and locked in the open position. The tank is now ready for filling. Leave the gun alone now and go to the pump.
At the pump, and sited close to the display counter, will be a delivery push button - often a big green button. Press and hold in this button - do not release the button once pressed - it may take some seconds before anything happens, be patient, eventually the pump counter will begin to move showing gas is being dispensed. Once the gas tank is near 80 percent full the pump counter will begin to slow down, then stop. One may hear the tank automatic shut-off valve operate. Now release the delivery press button.
To release the gun, first release the trigger (keep hands away from the gun nozzle) there may be a small burst of escaping gas as the trigger is released - don't worry this is normal! Now turn the shroud a quarter of a turn anti-clockwise to release the gun from the van filler. Replace the gun at the pump.
Should one release the delivery push button too early and before the tank has filled, it is usually necessary to go to the cash desk and have the pump reset before any more gas can be delivered.
In the UK there are other types of gun in use from that described above, but we have not used them.

In mainland Europe the filler guns on the pumps are a different design so adaptors are required - these screw into the bayonet filler body, the o-ring makes a seal. The cup-type adaptor on the left is for France, Portugal, Italy, Greece, etc. The Euro-type on the right is intended to be the European standard in the future, currently used in Spain. There are other types of adaptors, see the Tinley Tech web site in Sources page.
Some Options we Considered: Gas or Diesel Appliances?
From the very beginning we wanted to be able use the van in the winter and have the option of being self-sufficient. Clearly, we would need a gas or diesel heater for warming the interior, in addition to the gas/electric water heater, cooker and oven already installed. If we chose gas warm-air heating and wanted to stay at one place for a few days, we would have to store sufficient gas to do all this.
There is a good argument for using the van diesel supply for heating. Many trucks use this. We didn't do as much research into this as we would have liked. In the time we had it was difficult to make a decision based on opinions from users on this type of heater - some liked them others didn't. As we were already using gas for cooking and hot water, we decided to stay with gas for heating the interior.
Type of gas - Butane or Propane
As butane gas will not work efficiently when the cylinder is stored at near freezing temperatures, we would have to use propane, or a mixture of propane and butane, which do work at temperatures below freezing. LPG (liquid petroleum gas) is the common name used in the UK at garages, it is also known as Autogas. Autogas is propane in the UK. LPG in France (called GPL!) is a mix of propane and butane, the mix changing with the seasons. We have not noticed any difference between LPG/Autogas and GPL in practice, our appliances seem to work fine with either.
Gas bottles or Gas Tank?
There are many options, here are just some:
- one small non-refillable bottle in a small locker and change the bottle often, perhaps every 7-10 days if also using for heating - saves space inside the van, but not so convenient if one misjudges the usage and the bottle empties unexpectedly. Not much good for tours abroad. It is surprising how many pro-converters are still using this option.
- one big bottle in a large locker and change it only occasionally, perhaps 3-4 weeks (depending on how much one uses the heater) - large bottles tend to be taller and heavy and can take up a lot of space in a van conversion;
- refillable bottle(s)- still need locker space, but have the advantage of only one bottle required, and being refillable at petrol stations that sell LPG, both in UK and many parts of mainland Europe. Not cheap to buy, but can be transferred to new van if you sell old one. If using two bottles, a plethora of hoses, a changeover valve and gauge are often used adding to the cost and complexity. Note, if using refillable bottle(s) in France it is essential to have an external filling point fitted in the van side (see below). Opening a locker to connect the pump gun to an internal filler, or removing the bottle to connect the pump is not allowed.
- Underfloor refillable fixed tank - as for the refillable bottle, but saves valuable space inside van, not cheap to buy and not easily transferred to new van, but very simple installation and filling procedure. The cost of refilling the tank with LPG is much lower than exchanging a non-refillable bottle, although it would take many refills to pay for the tank, it is the convenience and space saving that is key.
Where you go and for how long - Types of bottle and regulator
As we anticipated extended trips to France, Spain, Italy and so forth, it became apparent that we would have to consider what we would do if we had UK non-refillable bottles and they ran out of gas. It seems many folks take only one non-refillable bottle with them and, should this run out, obtain a gas bottle and regulator locally and return this bottle to recover the deposit when leaving that country. This is fine if one stays put in the one country, but if one moves about the locker space inside the van would need to be large enough to carry all the bottles.
Whether buying gas bottles locally would work to advantage on an extended tour taking in say, France, Italy and Greece, we are not sure.