
- Home
- Making a start
- Design & Planning
- Windows & Rooflights
- Insulation & Flooring
- Furniture
- Beds & Seats
- Kitchen
- Washroom
- Electrics
- Gas
- Water
- Heating
- Lighting
- Security
- Accessories
- Sources & Suppliers
- Cost Guide
- Specification
- Tools-Materials-Methods
- About Us
- Gallery

Mileage travelled:


Site News
Overhead Lockers
Locker Design

These are basically just simple cupboards for storage of light items, however it did take quite a bit of work to get them right. We had two sets of overhead lockers to make: one row over the sofa with three doors, and a longer one over the kitchen which has four doors.
Before cutting any material we had a browse through our collection of magazine photos of professional van conversions to get an idea of shape and size of cupboards and doors. This didn't actually help much as many converters seem to use curve-fronted doors with lots of trim and we weren't up to those construction methods. We did find one design in a Timberland 'Endeavour' van conversion, so we copied the basics of that.
Timberland: up-market conversions, circa £40-54k. Gulp! (take heart, they are still bog-ordinary panel vans underneath it all).

What we particularly liked was the doors were hinged so that, when closed, they sloped very slightly inwards at the top - this meant the locker doors would always want to close themselves if they had not been properly shut - clever Mr Timberland.
This photo hopefully shows what we mean.
It is surprising how many pro conversions have locker doors which actually slope outwards at the top (we assume this is to increase the standing room area). Consequently these doors have a tendency to want to fly open all the time - so they use very strong sprung hinges to hold them closed. We recently inspected one such van, it took such force to overcome these hinge springs that the door flew open and almost knocked us off our feet. One can only wonder how long the tiny fixing screws will hold these fittings in place.
Matters of Scale, proportion and the Golden Mean
Once we made the first end panel in ply and fixed it in position on the shower partition - it just didn't look right. It was a matter of scale. It looked too small compared to its surroundings. We went back to our magazine pro conversion pics. Yes, our locker looked the same size as theirs, it was adequate, but ours just didn't look right in our van. We added 50mm to the height and depth and made another end panel. It seemed too big on the bench, but, in position, it now looked right.
[We have since looked at a number of pro conversions; some lockers are very small, some huge - ours are about mid-range - we are very happy with them!].
Size and proportions of the locker doors. On the locker above the sofa we estimated three locker doors would give us good cupboard access and, importantly, be aesthetically pleasing when entering the van or idly staring at the lockers (we do that on long, wet days). Each door is the same size; the ratio of the short side to the long side is 0.63. (This is close to the ideal proportions of the Golden Mean of 1:1.61. See Wiki for more info on this fascinating subject!). In our opinion, if the proportions of the furniture are more or less right, then it makes a big difference to feel of the interior of the van.
Construction

To get the end panel shape (which also gives the shape and size of the locker front frame and base shelf when seen as a 'sectional view'), we cut out a pattern in cardboard and stuck it in position. There was much trimming and sticking bits of card until it looked right! The difficult part is the angles (and shape) of the van roof and sides are not the same at both ends. This meant the end panels are different shapes where they butt against the roof and sides. After trimming the card for these differences, it was important to make sure the front and base edges of the end panels were still parallel to each other otherwise the whole cupboard framework would be twisted once fitted.

Once the end panel shapes were made in card it was simply a matter of copying them onto the 4mm cherry-veneered ply. We used the ply/softwood strip hollow panel construction method, with extra strips of softwood placed where the various fixing screws would fit.

The base shelf frame and front frame of the locker are very similar: softwood frames using simple half-lap joints thoughout. The base frame has an additional strip of rounded hardwood nosing screwed on, plus a sheet of veneered ply contact glued on the outside; the front frame is clad with strips of veneered ply, again contact glued on. The locker doors are hollow, double skinned veneered ply/softwood with additional strips where the 'D' cupboard handle fixes. Small, plastic 'double roller' catches have, so far, held the locker doors firmly shut - even when cornering enthusiastically.
We still have some work left to do in lining the cupboards with 3mm plain ply, but we can't complete this until the led spotlights, which fit into the base shelf at each corner, are wired and fixed in place.


For the locker above the sofa, fixing the right-hand end panel was straightforward as it was screwed to battens within the toilet partition. At the left-hand end, however, the panel had to be suspended from the van's steelwork - this was done with pieces of timber Sikaflex glued to one of the vans vertical steel ribs with captive nuts fixed into the batten. This batten supported a ply plate which was screwed to the locker end panel.
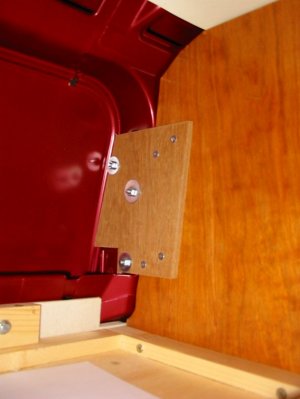
On the kitchen locker both end panels were screwed to ply plates. These plates attached to the van's vertical steel ribs with nuts and bolts and large washers.
To support the base shelf along its length, several wood blocks are fixed to the back edge of the shelf. The blocks are drilled for pan head machine screws which screw into captive nuts fixed in wood support blocks glued to the van steelwork. These blocks will be hidden eventually behind the cupboard ply lining.

The sofa and kitchen overhead lockers are the same in height (that is the cabinet itself and from the van floor). We felt this was important as, when viewed from the cab or sliding entrance door, the lockers would look all wrong if they were at different heights. However, the depth of the kitchen locker is 25mm less front to back - this gives a bit more head clearance when standing at the kitchen worktop. This difference is not noticeable.